Directional light is very good, but it only covers ordinary light that is everywhere. What about lights that aren't everywhere? Covered in the last lesson, in addition to directional lights, were point lights and spot lights. However, these two types of light sources have additional properties that I did not cover in the last lesson.
In addition to these two types of light sources, there comes a slight, and somewhat hidden, problem involved in lighting, which we will go over first. (Don't worry, it's an easy one.)
If, in messing around with lights, you tried to scale any of your models, you may have found a slight problem with the lighting. As your models got smaller, they also got lighter. Likewise, as your models got larger, they got darker.
Why is this exactly? Well, when you scale a model, the normals are scaled right along with it! And the smaller the normal, the brighter the object. This certainly doesn't help things (unless you want your models to get lighter when they get smaller).
This is a problem you may or may not have noticed. But if you haven't yet, you would have eventually. Fortunately, the fix is simple. All we have to do is set another render state to TRUE:
d3ddev->SetRenderState(D3DRS_NORMALIZENORMALS, TRUE);
What this does is make Direct3D automatically handle the normals. It fixes them at the correct length, despite how they were scaled.
And that's all there is to it. Now let's get back to light sources.
A point light, as discussed in the previous lesson, is a light which has an exact location, and emanates light in all directions from that location.
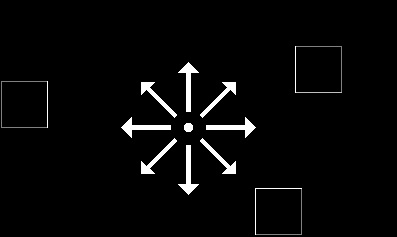
Point LightUnlike a directional light, a point light does not go on indefinitely. As the light travels away from the source, it gets dispersed, spreading out in every direction equally. Therefore, the farther an object is from a directional light, the less illuminated that object will be. This change in illumination is known as attenuation of light.
Before I go into attenuation, I want to talk about range.
Range itself is quite simple. It is the distance that a light shines. Beyond a light source's range, no light from that source is shown.
You set the range of a light by changing the light's Range value, like this:
light.Range = 100.0f;
This makes the light only extend for 100 units, meaning that after 100 units, the light will no longer be calculated into lighting operations, speeding up your game.
Attenuation is a bit more complex, and requires some basic algebra skills to fully understand (sorry, I have sat on this one for two weeks now trying to find an easier way to explain it and I just can't). Basically, attenuation controls how illuminated an object will be based on its distance from the light source. In other words, it controls how a light's intensity will decrease as it travels through space.
I am going to give you the algebraic function (not C++ function) for attenuation, then explain it in detail. You can read it if you want, or (if you are a math wiz already) you can skip it if you feel you get it enough to use it. Here is the function:
Atten = 1 / (att0 + att1 * d + att2 * d2)
Let's start at the beginning.
Atten is short for attenuation. It is a number between 1.0 and 0.0 which indicates the intensity of light. 1.0 is full intensity, while 0.0 is no intensity (no light). For each vertex within the light's range, the Atten is applied, along with the vertex's normal, to determine how much illumination there is.
d in this function represents distance. This refers to the distance between the vertex and the light. In the function it is multiplied by att1 and att2, which are constants I'll go over next.
There are three constant values in this equation, att0, att1 and att2. If you look, you will see that att0 is not multiplied by anything. This makes it a constant modifier. If you place a number in only this variable, you get a constant amount of light. This means there is no attenuation at all. For example, if you put 0.5 in this value, you will get a half-lit light that will extend all the way to the maximum range of the light.
att0 graphed at 0.5This is the second constant value. If used by itself, it is an inverse function, meaning that the light will dissipate more slowly as the distance increases. This is probably the most realistic type of light. Usually you can get away with just setting this to 1.0 and the other two values to 0.0. However, because of varying types of lights, this doesn't always work out.
att1 graphed at 1.0This is the third constant value. If used by itself, it is an inverse square function, meaning that the light will not only dissipate more slowly as the distance increases, but the dissipation will be very rapid at first, then sharply slow down. This type of attenuation has the effect of, say, a campfire at night. It is very bright around the campfire. But if you walk fifty feet away, you can still see objects lit by the fire, but very dimly. If you walk a hundred feet away, you'll still be able to see the light, and it probably won't get that much darker.
att2 graphed at 1.0When building a point light, you will want to look over the attenuation function and find out what values you want in each variable. You can combine them to get all kinds of different effects. You do this by plugging in each att value and seeing how brightly the light will show at various distances. This will give you some prediction on how the light will perform.
There is another thing to look out for, and that is having the Range of the light suddenly cut off an area where the light is still bright. Remember that Range determines how far Direct3D will calculate the attenuation. If the maximum range of the light is still quite bright with attenuation, it can make things look a bit unrealistic. If you position the Range correctly, you won't even notice where the edge of the light is.
Note that setting the range or attenuation for a directional light has no effect.
The following code sets up a point light. You should already be familiar with much of it, but some of it will be new. I have highlighted all the new or changed parts from the last example.
void init_light(void)
{
D3DLIGHT9 light;
D3DMATERIAL9 material;
ZeroMemory(&light, sizeof(light));
light.Type = D3DLIGHT_POINT; // make the light type 'point light'
light.Diffuse = D3DXCOLOR(0.5f, 0.5f, 0.5f, 1.0f);
light.Position = D3DXVECTOR3(0.0f, 5.0f, 0.0f);
light.Range = 100.0f; // a range of 100
light.Attenuation0 = 0.0f; // no constant inverse attenuation
light.Attenuation1 = 0.125f; // only .125 inverse attenuation
light.Attenuation2 = 0.0f; // no square inverse attenuation
d3ddev->SetLight(0, &light);
d3ddev->LightEnable(0, TRUE);
ZeroMemory(&material, sizeof(D3DMATERIAL9));
material.Diffuse = D3DXCOLOR(1.0f, 1.0f, 1.0f, 1.0f);
material.Ambient = D3DXCOLOR(1.0f, 1.0f, 1.0f, 1.0f);
d3ddev->SetMaterial(&material);
}
Let's quickly go through the new stuff.
This is the flag we use to indicate that we want a point light. It replaces D3DLIGHT_DIRECTIONAL used in the last example.
This is a float value that indicates the range of the light.
These three values represent the constants att0, att1 and att2 in the attenuation function.
Because this light has position, and not direction, we need to state where the light is. We don't actually have to change much. We need to set a D3DVECTOR, just like a directional light, and instead fill the Position value with it, instead of the Direction value.
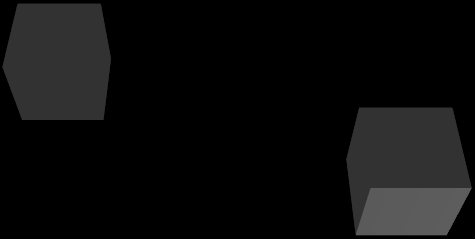
With the above point light, and with the proper use of matrices, I was able to produce this:
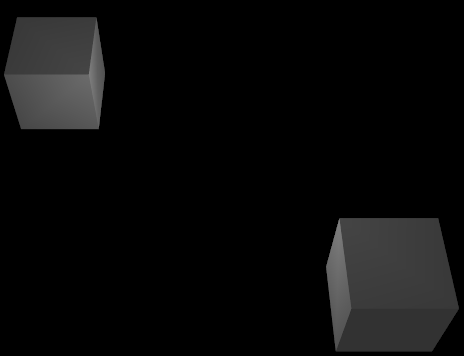
The Point LightAs you can see, the two cubes are each lit differently based on their position in relation to the point light (which is in the middle). In this example, I had the two cubes circling around the light, so that each would get light from a different direction.
As I mentioned in the previous lesson, the spotlight is the least-used, least-efficient, and least-simple type of light there is. It actually requires the entire D3DLIGHT9 struct to be filled. That means every single property we've gone over so far, including some new ones we haven't covered yet.
A spot light is a light that has both position and direction. In other words, it emanates light from a specific point and in a specifc direction.
Spot LightThere are three new properties in addition to what we have already covered. These properties are called Phi, Theta, and Falloff.
Of course, the spot light does not go exactly in one direction. That would be a lazer's job, and their are no perfect lazers in Direct3D. What would be the point? You can just as easily draw a pixel on the screen.
Instead, spot lights are shaped like cones, where the tip of the cone is the emanation point of the light. The center of the cone is in the direction given.
So how is this done to be realistic? Well, go into a dark room and shine a flashlight on a wall. You will see a very bright and small circle in the center of a larger and darker circle.
In Direct3D, this is recreated using two values to show how wide these two circles are.
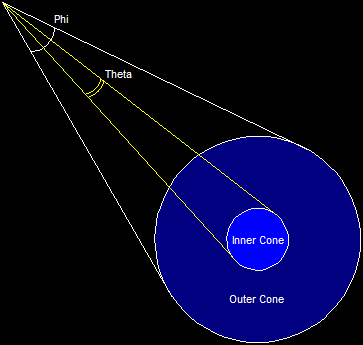
Phi and ThetaAs you can see, Theta represents the inner circle and Phi represents the outer circle. Phi and Theta are both float values which hold the angle used to determine the size of each circle.
Go back to the dark room and shine the light on the wall again. You will see that the bright circle actually fades away into the dark circle. It is not a sharp transition (unless you have a strange flashlight). This fading is called falloff. Falloff is a value used to control how fast the inner circle fades into the outer circle.

Spot Light FalloffUsually, falloff is determined by a float value of 1.0. This makes the light fade evenly. However, you can also get some interesting effects by changing to falloff value in certain ways.
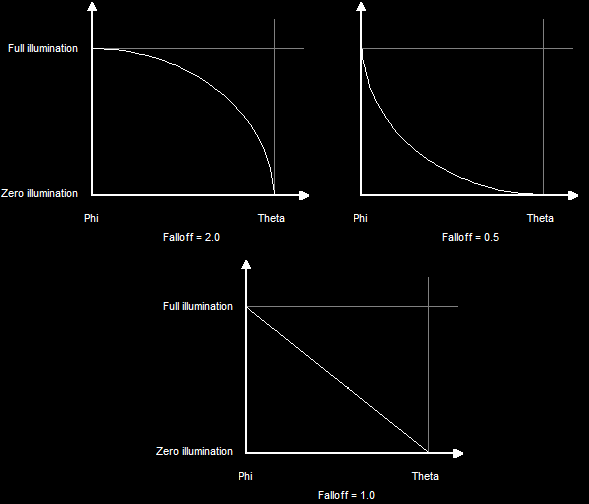
Various Falloff ValuesBecause creating a falloff other than 1.0 takes time to process, developers usually use 1.0, and leave the other effects alone. In fact, spot lights should be used rarely, beacuse the spot lights in general take extra time to process.
Setting up a spot light is exactly like setting up a point light, but with the new properties included. The four properties added here from the code above are phi, theta, falloff and direction. Also, the type was changed to D3DLIGHT_SPOT.
void init_light(void)
{
D3DLIGHT9 light;
D3DMATERIAL9 material;
ZeroMemory(&light, sizeof(light));
light.Type = D3DLIGHT_SPOT; // make the light type 'spot light'
light.Diffuse = D3DXCOLOR(0.5f, 0.5f, 0.5f, 1.0f);
light.Position = D3DXVECTOR3(-12.0f, 0.0f, 30.0f);
light.Direction = D3DXVECTOR3(0.0f, 0.0f, -1.0f);
light.Range = 100.0f; // a range of 100
light.Attenuation0 = 0.0f; // no constant inverse attenuation
light.Attenuation1 = 0.125f; // only .125 inverse attenuation
light.Attenuation2 = 0.0f; // no square inverse attenuation
light.Phi = D3DXToRadian(40.0f); // set the outer cone to 30 degrees
light.Theta = D3DXToRadian(20.0f); // set the inner cone to 10 degrees
light.Falloff = 1.0f; // use the typical falloff
d3ddev->SetLight(0, &light);
d3ddev->LightEnable(0, TRUE);
ZeroMemory(&material, sizeof(D3DMATERIAL9));
material.Diffuse = D3DXCOLOR(1.0f, 1.0f, 1.0f, 1.0f);
material.Ambient = D3DXCOLOR(1.0f, 1.0f, 1.0f, 1.0f);
d3ddev->SetMaterial(&material);
}
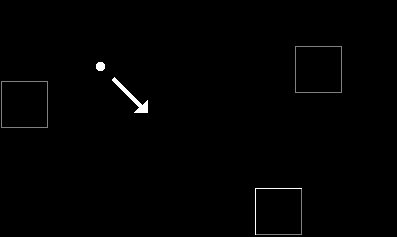
When I plugged this into the same demo from above, I got this:
The Spot LightAs you can see, the box on the right is illuminated, whereas the box on the left is only lit with ambient lighting. The box on the right is lit by the spot light.
For the final program we will build a demo similar to the one's I used to show the lights above, but with only one cube. We'll have it going around in a circle, and we'll use a point light in the center.
This is the same as the last lesson's demo, with the new parts covered in bold.
[
Main.cpp]
// include the basic windows header files and the Direct3D header file
#include <windows.h>
#include <windowsx.h>
#include <d3d9.h>
#include <d3dx9.h>
// define the screen resolution
#define SCREEN_WIDTH 800
#define SCREEN_HEIGHT 600
// include the Direct3D Library files
#pragma comment (lib, "d3d9.lib")
#pragma comment (lib, "d3dx9.lib")
// global declarations
LPDIRECT3D9 d3d;
LPDIRECT3DDEVICE9 d3ddev;
LPDIRECT3DVERTEXBUFFER9 v_buffer = NULL;
LPDIRECT3DINDEXBUFFER9 i_buffer = NULL;
// function prototypes
void initD3D(HWND hWnd);
void render_frame(void);
void cleanD3D(void);
void init_graphics(void);
void init_light(void);
struct CUSTOMVERTEX {FLOAT X, Y, Z; D3DVECTOR NORMAL;};
#define CUSTOMFVF (D3DFVF_XYZ | D3DFVF_NORMAL)
// the WindowProc function prototype
LRESULT CALLBACK WindowProc(HWND hWnd, UINT message, WPARAM wParam, LPARAM lParam);
// the entry point for any Windows program
int WINAPI WinMain(HINSTANCE hInstance,
HINSTANCE hPrevInstance,
LPSTR lpCmdLine,
int nCmdShow)
{
HWND hWnd;
WNDCLASSEX wc;
ZeroMemory(&wc, sizeof(WNDCLASSEX));
wc.cbSize = sizeof(WNDCLASSEX);
wc.style = CS_HREDRAW | CS_VREDRAW;
wc.lpfnWndProc = WindowProc;
wc.hInstance = hInstance;
wc.hCursor = LoadCursor(NULL, IDC_ARROW);
wc.lpszClassName = L"WindowClass";
RegisterClassEx(&wc);
hWnd = CreateWindowEx(NULL, L"WindowClass", L"Our Direct3D Program",
WS_OVERLAPPEDWINDOW, 0, 0, SCREEN_WIDTH, SCREEN_HEIGHT,
NULL, NULL, hInstance, NULL);
ShowWindow(hWnd, nCmdShow);
// set up and initialize Direct3D
initD3D(hWnd);
// enter the main loop:
MSG msg;
while(TRUE)
{
while(PeekMessage(&msg, NULL, 0, 0, PM_REMOVE))
{
TranslateMessage(&msg);
DispatchMessage(&msg);
}
if(msg.message == WM_QUIT)
break;
render_frame();
}
cleanD3D();
return msg.wParam;
}
// this is the main message handler for the program
LRESULT CALLBACK WindowProc(HWND hWnd, UINT message, WPARAM wParam, LPARAM lParam)
{
switch(message)
{
case WM_DESTROY:
{
PostQuitMessage(0);
return 0;
} break;
}
return DefWindowProc (hWnd, message, wParam, lParam);
}
// this function initializes and prepares Direct3D for use
void initD3D(HWND hWnd)
{
d3d = Direct3DCreate9(D3D_SDK_VERSION);
D3DPRESENT_PARAMETERS d3dpp;
ZeroMemory(&d3dpp, sizeof(d3dpp));
d3dpp.Windowed = TRUE;
d3dpp.SwapEffect = D3DSWAPEFFECT_DISCARD;
d3dpp.hDeviceWindow = hWnd;
d3dpp.BackBufferFormat = D3DFMT_X8R8G8B8;
d3dpp.BackBufferWidth = SCREEN_WIDTH;
d3dpp.BackBufferHeight = SCREEN_HEIGHT;
d3dpp.EnableAutoDepthStencil = TRUE;
d3dpp.AutoDepthStencilFormat = D3DFMT_D16;
// create a device class using this information and the info from the d3dpp stuct
d3d->CreateDevice(D3DADAPTER_DEFAULT,
D3DDEVTYPE_HAL,
hWnd,
D3DCREATE_SOFTWARE_VERTEXPROCESSING,
&d3dpp,
&d3ddev);
init_graphics(); // call the function to initialize the cube
init_light(); // call the function to initialize the light and material
d3ddev->SetRenderState(D3DRS_LIGHTING, TRUE); // turn on the 3D lighting
d3ddev->SetRenderState(D3DRS_ZENABLE, TRUE); // turn on the z-buffer
d3ddev->SetRenderState(D3DRS_AMBIENT, D3DCOLOR_XRGB(50, 50, 50)); // ambient light
d3ddev->SetRenderState(D3DRS_NORMALIZENORMALS, TRUE); // handle normals in scaling
}
// this is the function used to render a single frame
void render_frame(void)
{
d3ddev->Clear(0, NULL, D3DCLEAR_TARGET, D3DCOLOR_XRGB(0, 0, 0), 1.0f, 0);
d3ddev->Clear(0, NULL, D3DCLEAR_ZBUFFER, D3DCOLOR_XRGB(0, 0, 0), 1.0f, 0);
d3ddev->BeginScene();
// select which vertex format we are using
d3ddev->SetFVF(CUSTOMFVF);
// set the view transform
D3DXMATRIX matView; // the view transform matrix
D3DXMatrixLookAtLH(&matView,
&D3DXVECTOR3 (0.0f, 40.0f, 30.0f), // the camera position
&D3DXVECTOR3 (0.0f, 0.0f, 0.0f), // the look-at position
&D3DXVECTOR3 (0.0f, 1.0f, 0.0f)); // the up direction
d3ddev->SetTransform(D3DTS_VIEW, &matView); // set the view transform to matView
// set the projection transform
D3DXMATRIX matProjection; // the projection transform matrix
D3DXMatrixPerspectiveFovLH(&matProjection,
D3DXToRadian(45), // the horizontal field of view
(FLOAT)SCREEN_WIDTH / (FLOAT)SCREEN_HEIGHT, // aspect ratio
1.0f, // the near view-plane
100.0f); // the far view-plane
d3ddev->SetTransform(D3DTS_PROJECTION, &matProjection); // set the projection
// set the world transform
static float index = 0.0f; index+=0.03f; // an ever-increasing float value
D3DXMATRIX matTranslate; // the world transform matrix
D3DXMatrixTranslation(&matTranslate,
(float)sin(index) * 12.0f, 0.0f, (float)cos(index) * 25.0f);
d3ddev->SetTransform(D3DTS_WORLD, &(matTranslate)); // set the world transform
// select the vertex and index buffers to use
d3ddev->SetStreamSource(0, v_buffer, 0, sizeof(CUSTOMVERTEX));
d3ddev->SetIndices(i_buffer);
// draw the cube
d3ddev->DrawIndexedPrimitive(D3DPT_TRIANGLELIST, 0, 0, 24, 0, 12);
d3ddev->EndScene();
d3ddev->Present(NULL, NULL, NULL, NULL);
}
// this is the function that cleans up Direct3D and COM
void cleanD3D(void)
{
v_buffer->Release(); // close and release the vertex buffer
i_buffer->Release(); // close and release the vertex buffer
d3ddev->Release(); // close and release the 3D device
d3d->Release(); // close and release Direct3D
}
// this is the function that puts the 3D models into video RAM
void init_graphics(void)
{
// create the vertices using the CUSTOMVERTEX struct
CUSTOMVERTEX vertices[] =
{
{ -3.0f, -3.0f, 3.0f, 0.0f, 0.0f, 1.0f, }, // side 1
{ 3.0f, -3.0f, 3.0f, 0.0f, 0.0f, 1.0f, },
{ -3.0f, 3.0f, 3.0f, 0.0f, 0.0f, 1.0f, },
{ 3.0f, 3.0f, 3.0f, 0.0f, 0.0f, 1.0f, },
{ -3.0f, -3.0f, -3.0f, 0.0f, 0.0f, -1.0f, }, // side 2
{ -3.0f, 3.0f, -3.0f, 0.0f, 0.0f, -1.0f, },
{ 3.0f, -3.0f, -3.0f, 0.0f, 0.0f, -1.0f, },
{ 3.0f, 3.0f, -3.0f, 0.0f, 0.0f, -1.0f, },
{ -3.0f, 3.0f, -3.0f, 0.0f, 1.0f, 0.0f, }, // side 3
{ -3.0f, 3.0f, 3.0f, 0.0f, 1.0f, 0.0f, },
{ 3.0f, 3.0f, -3.0f, 0.0f, 1.0f, 0.0f, },
{ 3.0f, 3.0f, 3.0f, 0.0f, 1.0f, 0.0f, },
{ -3.0f, -3.0f, -3.0f, 0.0f, -1.0f, 0.0f, }, // side 4
{ 3.0f, -3.0f, -3.0f, 0.0f, -1.0f, 0.0f, },
{ -3.0f, -3.0f, 3.0f, 0.0f, -1.0f, 0.0f, },
{ 3.0f, -3.0f, 3.0f, 0.0f, -1.0f, 0.0f, },
{ 3.0f, -3.0f, -3.0f, 1.0f, 0.0f, 0.0f, }, // side 5
{ 3.0f, 3.0f, -3.0f, 1.0f, 0.0f, 0.0f, },
{ 3.0f, -3.0f, 3.0f, 1.0f, 0.0f, 0.0f, },
{ 3.0f, 3.0f, 3.0f, 1.0f, 0.0f, 0.0f, },
{ -3.0f, -3.0f, -3.0f, -1.0f, 0.0f, 0.0f, }, // side 6
{ -3.0f, -3.0f, 3.0f, -1.0f, 0.0f, 0.0f, },
{ -3.0f, 3.0f, -3.0f, -1.0f, 0.0f, 0.0f, },
{ -3.0f, 3.0f, 3.0f, -1.0f, 0.0f, 0.0f, },
};
// create a vertex buffer interface called v_buffer
d3ddev->CreateVertexBuffer(24*sizeof(CUSTOMVERTEX),
0,
CUSTOMFVF,
D3DPOOL_MANAGED,
&v_buffer,
NULL);
VOID* pVoid; // a void pointer
// lock v_buffer and load the vertices into it
v_buffer->Lock(0, 0, (void**)&pVoid, 0);
memcpy(pVoid, vertices, sizeof(vertices));
v_buffer->Unlock();
// create the indices using an int array
short indices[] =
{
0, 1, 2, // side 1
2, 1, 3,
4, 5, 6, // side 2
6, 5, 7,
8, 9, 10, // side 3
10, 9, 11,
12, 13, 14, // side 4
14, 13, 15,
16, 17, 18, // side 5
18, 17, 19,
20, 21, 22, // side 6
22, 21, 23,
};
// create an index buffer interface called i_buffer
d3ddev->CreateIndexBuffer(36*sizeof(short),
0,
D3DFMT_INDEX16,
D3DPOOL_MANAGED,
&i_buffer,
NULL);
// lock i_buffer and load the indices into it
i_buffer->Lock(0, 0, (void**)&pVoid, 0);
memcpy(pVoid, indices, sizeof(indices));
i_buffer->Unlock();
}
// this is the function that sets up the lights and materials
void init_light(void)
{
D3DLIGHT9 light;
D3DMATERIAL9 material;
ZeroMemory(&light, sizeof(light));
light.Type = D3DLIGHT_POINT; // make the light type 'point light'
light.Diffuse = D3DXCOLOR(0.5f, 0.5f, 0.5f, 1.0f);
light.Position = D3DXVECTOR3(0.0f, 5.0f, 0.0f);
light.Range = 100.0f; // a range of 100
light.Attenuation0 = 0.0f; // no constant inverse attenuation
light.Attenuation1 = 0.125f; // only .125 inverse attenuation
light.Attenuation2 = 0.0f; // no square inverse attenuation
d3ddev->SetLight(0, &light);
d3ddev->LightEnable(0, TRUE);
ZeroMemory(&material, sizeof(D3DMATERIAL9));
material.Diffuse = D3DXCOLOR(1.0f, 1.0f, 1.0f, 1.0f);
material.Ambient = D3DXCOLOR(1.0f, 1.0f, 1.0f, 1.0f);
d3ddev->SetMaterial(&material);
}
If you run this, you should get something like this:
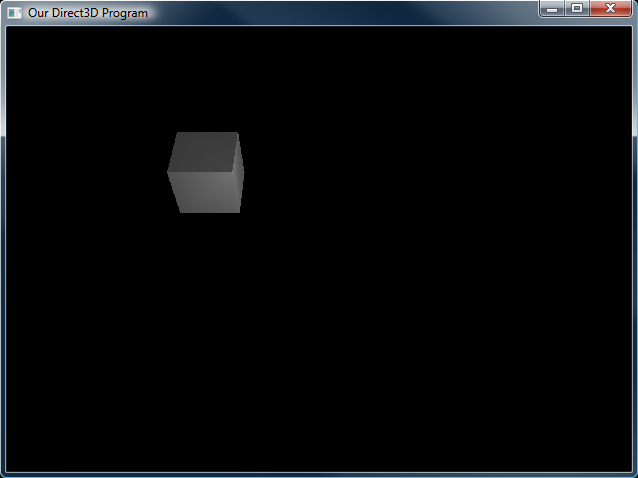
The Point Light in Action So now you know all about basic lighting. I will go over additional lighting techniques later, but for now, get good at using the basic light sources, setting them up in strategic positions, and getting a scene well lit. I recommend doing these exercises:
1. Make a point light circle around a box.
2. Have a spot light spin around on the Y-axis and light the things around it.
3. Light up a box with point lights, spot lights, and directional lights!
Next Lesson: Blending Colors for Special Effects
GO! GO! GO!
© 2006-2026 DirectXTutorial.com. All Rights Reserved.
Expand