So far, we have programmed very simple 3D scenes using no lights. This meant that everything was lighted equally and brightly, leaving no room for realism. In this lesson, we are going to cover how to use lights to illuminate your 3D scene, allowing your models to look somewhat like they exist in the real world.
But before we dive into the code, we will cover a little bit of theory on how exactly light works in Direct3D. Then, once the mechanics are covered, we will put together another classic cube, this time illuminating it with realistic lighting.
If you have played many games, you may have noticed that the quality of lighting in those 3D games is not exactly as it would be in the real world. Indeed, 3D lighting currently comes nowhere near the real world. The amount of detailed mathematics involved in real-world lighting is so immensly complex that I can hardly imagine a computer dealing with it at all, not to mention dealing with it in real-time.

The Complexity of Real-World LightingImagine what it would take to render exact, real-world light. First of all, a light would fall directly onto a surface, illuminating it somewhat. The light would pass through the air, bouncing off dust particles and scattering through the air in an incomprehensibly complex pattern. This would cause other surfaces to be illuminated, even though no light falls on them directly. Then there is the fact that objects reflect more light in a certain direction, giving it a shine and somewhat hiding the color beneath.
I could go on for five or six lessons just explaining the light phenomena seen in Image 9.1 alone (and there is a lot more to light than just that). However, to spare you the fried brains, I'm just going to get to the point:
Direct3D uses lights to approximate real-world lighting. It does this using a system of calculation that is much less time-consuming, and that can therefore be run in real-time. This system is built up of a set of types of lighting and types of light sources.
There are three types of lighting that can be used to approximate real-world light. They are called diffuse lighting, ambient lighting and specular lighting.
Diffuse lighting is light that more or less falls directly onto a surface. If you hold up your hand in a room with one light source, you will see that one side of your hand is lit, while the other side is not. That side of your hand is lit with what is called diffuse light.
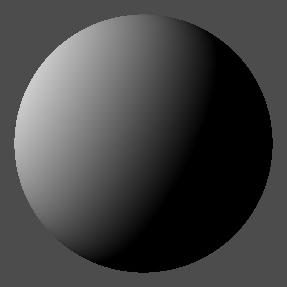
Diffuse LightAmbient lighting consists of light that is everywhere. Generally speaking, it is quite dark (though not totally dark). When you hold your hand up in that room with one light source, the dark side of your hand is ambiently lit, and the light that is reflected there is refered to as ambient light.
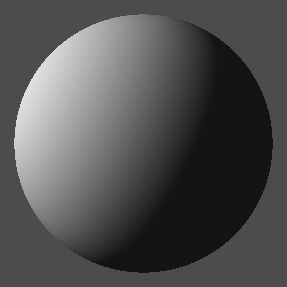
Ambient LightSpecular lighting is often refered to as specular highlight or, even more commonly, reflection. (Wow, big word, huh?) When light reflects off an object, ususally most of the light will go in one specific direction (rather than scatter everywhere evenly). The result is that each object has a little shine on it that comes from the light source.
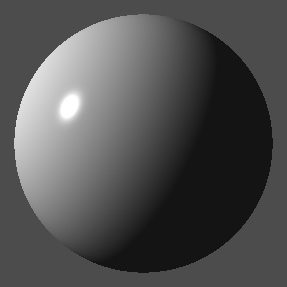
Specular Light
In order to produce the three types of light in the correct volumes and in the correct directions, there are several types of light sources, each with different properties, that produce the various types of light.
In order to produce the three types of light, there are several types of lights (or light sources) that emanate light. The various types of light sources, each emanating specific types and colors of light and then combined together with other light sources, can produce a realistic lighting scene. Well, perhaps not quite like the light from the first image above.
I think the best way to thoroughly explain light sources is to describe each type of light source, so here we go. The following are all types of light sources:
1. Ambient Lights
2. Directional Lights
3. Point Lights
4. Spot Lights
Ambient lights do just what they say: they make ambient light. Ambient lights are relatively simple. The only real adjustable property of an ambient light is its color, as it has no specific source or direction.
Usually this color is white or gray. The darker the gray, the darker the environment seems to be. Using pure white ambient light is the equivalent to just not using lights at all.
Directional lights are similar to ambient lights in that both ambient lights and directional lights shine light from everywhere at once. The only difference is that directional lights, as the name implies, gives light in a specifc direction.
In other words, you can use this light source to illuminate a specifc side of every object in your 3D scene. This next image shows this.
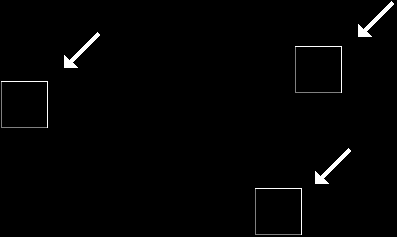
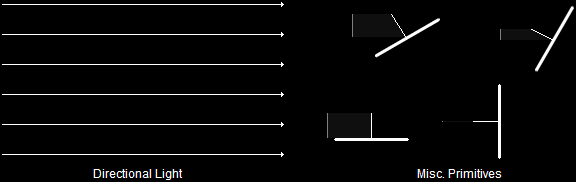
Directional LightAs you can see, the light comes from everywhere, but only shines in one direction. This can be used to create a sunlight effect, where the sunlight comes from one broad direction.
Directional lights produce ambient, diffuse and specular light. If you already have an ambient light source in place, a directional light will produce additional ambient light when it is enabled, and not produce it when it is disabled.
Point lights are lights that have no specific direction, but instead have location, and emanate light in all directions from one specific point. They emanate ambient, diffuse and specular light.
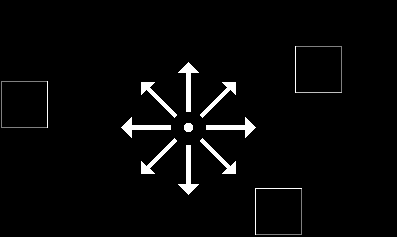
Point LightMost lights in your game (as in lamps, fires, etc.) will use this type of light source.
A spot light is a rather specialized type of light. It has both location and direction, and thus produces a beam of light. This is useful for things like flashlights or vehicle headlights, and not much else.
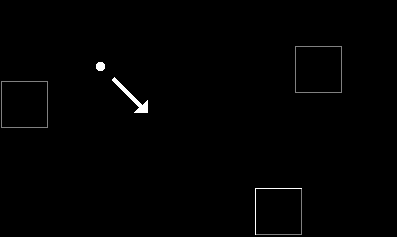
Spot Light
A material is a description of how surfaces reflect light, and which colors are involved. In other words, you won't necessarily see this color. You will only see it when you shine a light on it.
Of course, a good 3D game always has lights shining on its objects, so materials are usually taken into consideration.
Let me use a couple of pictures to explain what a material is exactly. Let's say we have a white square. Let's give it a white material and illuminate it with a white light.

A Pure White SquareJust what we had before, a white square. The surface is exactly as it would have been without using lighting. However, let's now give the square a red material, while keeping the white light.

A Pure Red SquareNow we have a red square. What happened here? Well, the red material made the surface of the square entirely red. Only red light was reflect off, and so the surface appeared red. If we shined a completely blue light on this square, nothing would show up at all (because no blue reflects off).
However, if we added some blue and some green into the material, we would get a much more controllable color, as well as a much more realistic one.

A Reddish SquareThis may look somewhat different to the pure red square, but by itself it's still quite red. Now what happens if we add a bluish light to the square. (A bluish light, not a blue light.)

Purple SquarePurple! Actaully it's still reddish, but any reddish surface with a bluish light on it appears purple. Realistic.
The moral of this little demonstration is to not have materials or lights that have only one primary color. Use white (or gray) as much as possible. I know we aren't up to the point of putting any color into lights or materials, but keep that in mind.
Fiddling with materials and lights is a bit like mixing paint in a room with funky lights. All kinds of things can happen. The paint will even sometimes go black, even though it's really a bright yellow (pure yellow paint mixed with a pure blue light).
The topic I will discuss in this section is one of those topics I wish Direct3D could make do without, for it can get annoying sometimes. The trouble is, it is absolutely necessary.
Consider this simple problem:
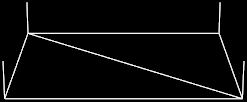
Suppose you have a single, square surface which is lit from one side by a soft, diffuse light.

A Diffusely Lit SquareIt's a wonderful square we have, but it would be better if it rotated somewhat (stationary objects always bore me):
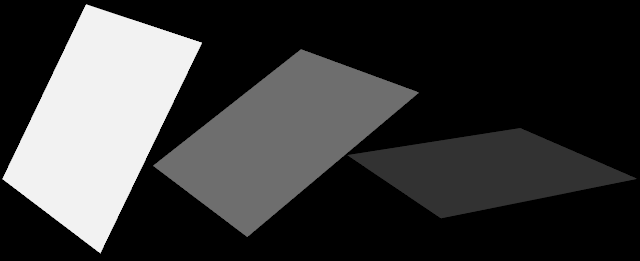
Some Less Diffusely Lit SquaresNaturally, the farther the square tilts, the less the square will be lit. The problem is, exactly how lit should this square of ours be as it tilts farther away from the light?
The answer lies in a geometrical term called a normal. A normal is a vector that is perpendicular to a surface.
So how is this an answer exactly? Take a look at this next diagram.
Sizing Up the NormalsAs each surface tilts farther away from the light, the normal vector becomes more exposed to the light due to its 90° angle. Direct3D uses the angle of the normal in relation to the angle of the light to determine how brightly lit the surface should be. The less the difference in the angles, the more light there will be shining on the surface.
Unfortunately, Direct3D does not determine the normal of a surface for you. This is one of the more annoying parts about lighting. You must determine each surface normal for yourself. You do this by appointing a normal vector to each vertex around the surface. These normals are called vertex normals.
Vertex NormalsEach of the normals here are vectors set to (0, 1, 0), meaning they point directly up. A normal, which is usually one unit long, tends to point away from the triangle it goes to make up. So if this square were on its side, it might be (1, 0, 0).
Now, if this were a cube, it would look something like this:
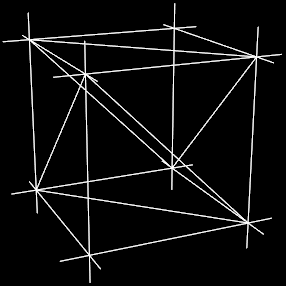
A Cube with NormalsNotice that each vertex has three normals sticking out of it. This is because it controls the light on all three surfaces it connects to. Unfortunately, a vertex can only have one normal. This means that we will need to create three vertices for each corner of a cube.
Ok, enough with the theory. Let's get this into practice.
Unfortunately, lighting is not so simple that it can be done with a single function call. In fact, there are quite a few things to do. Let's list them, then go over them in detail.
1. Setting Up a New Flexible Vertex Format
2. Turning the Lighting On
3. Setting the Ambient Light
4. Creating and Setting the Diffuse Light
5. Creating and Setting the Material
The first three are very simple, but the last two will require a whole function to themselves. But let's take the first ones first.
Once again the FVF code and the vertex format will change. This time we are going to take out the diffuse color and add a new property in: the vertex normal. Here is the new FVF code and vertex format:
struct CUSTOMVERTEX {FLOAT X, Y, Z; D3DVECTOR NORMAL;};
#define CUSTOMFVF (D3DFVF_XYZ | D3DFVF_NORMAL)
This is a new one, although it is really small and straightforward. Here it is:
typedef struct D3DVECTOR {
float x, y, z;
} D3DVECTOR, *LPD3DVECTOR;
One word. Simple. Once you look at the finished program, you'll see how this is used when defining vertices. But for now let's move on.
This one is even easier. In fact, the function call is already there in the previous lessons. We just have to change one of its two parameters from FALSE to TRUE:
d3ddev->SetRenderState(D3DRS_LIGHTING, TRUE);
Perhaps this one isn't quite as easy as step 2, but I don't think you'll mind.
What this step does is make sure that your objects are visible somewhat, even if no lights are shining on them directly. Although other lights can add to this ambience when they are included, this step sets the amount of light that will be present when no lights are included.
This step uses the same function, SetRenderState, however the first parameter changes to a different flag, D3DRS_AMBIENT. The second parameter is the color of the ambient light.
d3ddev->SetRenderState(D3DRS_AMBIENT, D3DCOLOR_XRGB(50, 50, 50)); // ambient light
As metioned before, a dark gray resembles a darkish environment, whereas a lighter gray (perhaps 200, 200, 200) resembles a well-lit, probably outdoor, environment.
This step is longer than normal. It's actually not that bad, it's just longer. I'll just show it to you and then go over each part of it. Because of the size and flexibility of this step, I'm going to give it it's own function called init_light(). Here it is:
// this is the function that sets up the lights and materials
void init_light(void)
{
D3DLIGHT9 light; // create the light struct
ZeroMemory(&light, sizeof(light)); // clear out the light struct for use
light.Type = D3DLIGHT_DIRECTIONAL; // make the light type 'directional light'
light.Diffuse = D3DXCOLOR(0.5f, 0.5f, 0.5f, 1.0f); // set the light's color
light.Direction = D3DXVECTOR3(-1.0f, -0.3f, -1.0f);
d3ddev->SetLight(0, &light); // send the light struct properties to light #0
d3ddev->LightEnable(0, TRUE); // turn on light #0
}
The comments make it pretty simple, but I will go over each of the above in detail:
D3DLIGHT9 is a struct that contains all the information about a light, no matter its type. In this lesson, we will cover the properties required for a directional light. The other types will be covered in the next lesson. However, so far we have been introduced to the following contents of the struct:
This one is easy. It consists of three flags that define each of the three types of light sources (excluding the ambient light source, which we have covered already). This table shows the available flags for this value.
| Value | Description |
|---|
| D3DLIGHT_DIRECTIONAL | Creates a directional light, a light that comes from everywhere at once, but shines only in one direction. |
| D3DLIGHT_POINT | Creates a point light, a light that emanates equally in all directions from one exact point. |
| D3DLIGHT_SPOT | Creates a spot light, a light that emanates in one direction from one exact point. |
For this lesson, we will use D3DLIGHT_DIRECTIONAL, as the others have properties not covered so far.
This one is actually a struct in itself, which consists of four FLOATs. They are labeled r, g, b and a. We can guess what they stand for. Red, Green, Blue and Alpha. Easy?
Up until now, you have used colors on a scale from 0 to 255. However, when working with D3DLIGHT9, you usually use values from 0.0f to 1.0f. 1.0f is full color and 0.0f is no color, with decimals in between.
In this lesson, we have each primary color set to 0.5f and the Alpha (which is covered later) to 1.0f.
This value contains a D3DXVECTOR3 struct. This is almost the exact same struct we used for the vertex normals when rebuilding the FVF code. The only difference is that we can initialize it's values right in the same line of code.
The struct contains the exact direction the directional light will point in. In our code, we set the x-direction to -1.0f, the y-direction to -0.3f and the z-direction -1.0f.
Now we a couple of simple functions to cover.
SetLight() is a function used to tell the Direct3D device about the light we are building. This function simply takes the properties we just constructed and stores them away on the graphics device.
The first parameter is an arbitrary number we give to the light. We are giving it 0. We could give it 42, but I find that number to be a little too philosophical. We'll stick to 0 for now. It doesn't matter what it is, so long as we remember it later.
The second parameter is the address of the struct we built. We'll just put '&light' in this.
Next function.
This turns the light on. By default, the light is off.
The first parameter is the light number. We used 0 before, so we'll use 0 here.
The second parameter is the state of the light. TRUE for on, FALSE for off. This function is useful if you have lights that turn on and off during the game. However, for our example, we will just turn it on and leave it on.
And that's all there is to building a directional light. However, there is one final step to do before you run the program.
The last thing to do before we run the program once more is to add a material. Materials do not work in vertices like many other things do. What happens is we set a material, and then any vertex drawn after that will be drawn with that material. It will be drawn that way until we set a different material.
Let's do this like we did the light. I'll give you the code, then explain it. For this example I'm going to combine the light and the material into one function, which should make things simpler. Here is the function now:
// this is the function that sets up the lights and materials
void init_light(void)
{
D3DLIGHT9 light; // create the light struct
D3DMATERIAL9 material; // create the material struct
ZeroMemory(&light, sizeof(light)); // clear out the light struct for use
light.Type = D3DLIGHT_DIRECTIONAL; // make the light type 'directional light'
light.Diffuse = D3DXCOLOR(0.5f, 0.5f, 0.5f, 1.0f); // set the light's color
light.Direction = D3DXVECTOR3(-1.0f, -0.3f, -1.0f);
d3ddev->SetLight(0, &light); // send the light struct properties to light #0
d3ddev->LightEnable(0, TRUE); // turn on light #0
ZeroMemory(&material, sizeof(D3DMATERIAL9)); // clear out the struct for use
material.Diffuse = D3DXCOLOR(1.0f, 1.0f, 1.0f, 1.0f); // set diffuse color to white
material.Ambient = D3DXCOLOR(1.0f, 1.0f, 1.0f, 1.0f); // set ambient color to white
d3ddev->SetMaterial(&material); // set the globably-used material to &material
}
Let's go over the new players:
This is a very simple struct, which contains color structs for each type of lighting. What I mean by color struct is a struct that consists of r, g, b and a, just like in light.Diffuse. In our D3DMATERIAL9 struct, we use two structs:
This sets the color of diffuse light that will reflect off the surfaces rendered. The color put in here only has an effect on diffuse light. No other type.
For simplicity (and realism) we will set all the diffuse values of this material to 1.0f.
Because we also have ambient light in our scene, we will need to include a material color for that type of lighting as well. We will set these values to 1.0f, just as in diffuse.
This is the function that sets the material. It's only parameter is simply the address of the struct we put together.
And that really is all there is to a basic light. Let's try it out and make it into a finished program.
In this lesson we're going to use the traditional cube. As usual, I've taken the code from the last lesson and made the changes in bold. Notice that the vertex and index buffers are both changed.
[
Main.cpp]
// include the basic windows header files and the Direct3D header file
#include <windows.h>
#include <windowsx.h>
#include <d3d9.h>
#include <d3dx9.h>
// define the screen resolution
#define SCREEN_WIDTH 800
#define SCREEN_HEIGHT 600
// include the Direct3D Library files
#pragma comment (lib, "d3d9.lib")
#pragma comment (lib, "d3dx9.lib")
// global declarations
LPDIRECT3D9 d3d;
LPDIRECT3DDEVICE9 d3ddev;
LPDIRECT3DVERTEXBUFFER9 v_buffer = NULL;
LPDIRECT3DINDEXBUFFER9 i_buffer = NULL;
// function prototypes
void initD3D(HWND hWnd);
void render_frame(void);
void cleanD3D(void);
void init_graphics(void);
void init_light(void); // sets up the light and the material
struct CUSTOMVERTEX {FLOAT X, Y, Z; D3DVECTOR NORMAL;};
#define CUSTOMFVF (D3DFVF_XYZ | D3DFVF_NORMAL)
// the WindowProc function prototype
LRESULT CALLBACK WindowProc(HWND hWnd, UINT message, WPARAM wParam, LPARAM lParam);
// the entry point for any Windows program
int WINAPI WinMain(HINSTANCE hInstance,
HINSTANCE hPrevInstance,
LPSTR lpCmdLine,
int nCmdShow)
{
HWND hWnd;
WNDCLASSEX wc;
ZeroMemory(&wc, sizeof(WNDCLASSEX));
wc.cbSize = sizeof(WNDCLASSEX);
wc.style = CS_HREDRAW | CS_VREDRAW;
wc.lpfnWndProc = WindowProc;
wc.hInstance = hInstance;
wc.hCursor = LoadCursor(NULL, IDC_ARROW);
wc.lpszClassName = L"WindowClass";
RegisterClassEx(&wc);
hWnd = CreateWindowEx(NULL, L"WindowClass", L"Our Direct3D Program",
WS_OVERLAPPEDWINDOW, 0, 0, SCREEN_WIDTH, SCREEN_HEIGHT,
NULL, NULL, hInstance, NULL);
ShowWindow(hWnd, nCmdShow);
// set up and initialize Direct3D
initD3D(hWnd);
// enter the main loop:
MSG msg;
while(TRUE)
{
while(PeekMessage(&msg, NULL, 0, 0, PM_REMOVE))
{
TranslateMessage(&msg);
DispatchMessage(&msg);
}
if(msg.message == WM_QUIT)
break;
render_frame();
}
// clean up DirectX and COM
cleanD3D();
return msg.wParam;
}
// this is the main message handler for the program
LRESULT CALLBACK WindowProc(HWND hWnd, UINT message, WPARAM wParam, LPARAM lParam)
{
switch(message)
{
case WM_DESTROY:
{
PostQuitMessage(0);
return 0;
} break;
}
return DefWindowProc (hWnd, message, wParam, lParam);
}
// this function initializes and prepares Direct3D for use
void initD3D(HWND hWnd)
{
d3d = Direct3DCreate9(D3D_SDK_VERSION);
D3DPRESENT_PARAMETERS d3dpp;
ZeroMemory(&d3dpp, sizeof(d3dpp));
d3dpp.Windowed = TRUE;
d3dpp.SwapEffect = D3DSWAPEFFECT_DISCARD;
d3dpp.hDeviceWindow = hWnd;
d3dpp.BackBufferFormat = D3DFMT_X8R8G8B8;
d3dpp.BackBufferWidth = SCREEN_WIDTH;
d3dpp.BackBufferHeight = SCREEN_HEIGHT;
d3dpp.EnableAutoDepthStencil = TRUE;
d3dpp.AutoDepthStencilFormat = D3DFMT_D16;
// create a device class using this information and the info from the d3dpp stuct
d3d->CreateDevice(D3DADAPTER_DEFAULT,
D3DDEVTYPE_HAL,
hWnd,
D3DCREATE_SOFTWARE_VERTEXPROCESSING,
&d3dpp,
&d3ddev);
init_graphics(); // call the function to initialize the cube
init_light(); // call the function to initialize the light and material
d3ddev->SetRenderState(D3DRS_LIGHTING, TRUE); // turn on the 3D lighting
d3ddev->SetRenderState(D3DRS_ZENABLE, TRUE); // turn on the z-buffer
d3ddev->SetRenderState(D3DRS_AMBIENT, D3DCOLOR_XRGB(50, 50, 50)); // ambient light
}
// this is the function used to render a single frame
void render_frame(void)
{
d3ddev->Clear(0, NULL, D3DCLEAR_TARGET, D3DCOLOR_XRGB(0, 0, 0), 1.0f, 0);
d3ddev->Clear(0, NULL, D3DCLEAR_ZBUFFER, D3DCOLOR_XRGB(0, 0, 0), 1.0f, 0);
d3ddev->BeginScene();
// select which vertex format we are using
d3ddev->SetFVF(CUSTOMFVF);
// set the view transform
D3DXMATRIX matView;
D3DXMatrixLookAtLH(&matView,
&D3DXVECTOR3 (0.0f, 8.0f, 25.0f), // the camera position
&D3DXVECTOR3 (0.0f, 0.0f, 0.0f), // the look-at position
&D3DXVECTOR3 (0.0f, 1.0f, 0.0f)); // the up direction
d3ddev->SetTransform(D3DTS_VIEW, &matView);
// set the projection transform
D3DXMATRIX matProjection;
D3DXMatrixPerspectiveFovLH(&matProjection,
D3DXToRadian(45),
(FLOAT)SCREEN_WIDTH / (FLOAT)SCREEN_HEIGHT,
1.0f, // the near view-plane
100.0f); // the far view-plane
d3ddev->SetTransform(D3DTS_PROJECTION, &matProjection);
// set the world transform
static float index = 0.0f; index+=0.03f;
D3DXMATRIX matRotateY;
D3DXMatrixRotationY(&matRotateY, index);
d3ddev->SetTransform(D3DTS_WORLD, &(matRotateY));
// select the vertex and index buffers to use
d3ddev->SetStreamSource(0, v_buffer, 0, sizeof(CUSTOMVERTEX));
d3ddev->SetIndices(i_buffer);
// draw the cube
d3ddev->DrawIndexedPrimitive(D3DPT_TRIANGLELIST, 0, 0, 24, 0, 12);
d3ddev->EndScene();
d3ddev->Present(NULL, NULL, NULL, NULL);
}
// this is the function that cleans up Direct3D and COM
void cleanD3D(void)
{
v_buffer->Release();
i_buffer->Release();
d3ddev->Release();
d3d->Release();
}
// this is the function that puts the 3D models into video RAM
void init_graphics(void)
{
// create the vertices using the CUSTOMVERTEX struct
CUSTOMVERTEX vertices[] =
{
{ -3.0f, -3.0f, 3.0f, 0.0f, 0.0f, 1.0f, }, // side 1
{ 3.0f, -3.0f, 3.0f, 0.0f, 0.0f, 1.0f, },
{ -3.0f, 3.0f, 3.0f, 0.0f, 0.0f, 1.0f, },
{ 3.0f, 3.0f, 3.0f, 0.0f, 0.0f, 1.0f, },
{ -3.0f, -3.0f, -3.0f, 0.0f, 0.0f, -1.0f, }, // side 2
{ -3.0f, 3.0f, -3.0f, 0.0f, 0.0f, -1.0f, },
{ 3.0f, -3.0f, -3.0f, 0.0f, 0.0f, -1.0f, },
{ 3.0f, 3.0f, -3.0f, 0.0f, 0.0f, -1.0f, },
{ -3.0f, 3.0f, -3.0f, 0.0f, 1.0f, 0.0f, }, // side 3
{ -3.0f, 3.0f, 3.0f, 0.0f, 1.0f, 0.0f, },
{ 3.0f, 3.0f, -3.0f, 0.0f, 1.0f, 0.0f, },
{ 3.0f, 3.0f, 3.0f, 0.0f, 1.0f, 0.0f, },
{ -3.0f, -3.0f, -3.0f, 0.0f, -1.0f, 0.0f, }, // side 4
{ 3.0f, -3.0f, -3.0f, 0.0f, -1.0f, 0.0f, },
{ -3.0f, -3.0f, 3.0f, 0.0f, -1.0f, 0.0f, },
{ 3.0f, -3.0f, 3.0f, 0.0f, -1.0f, 0.0f, },
{ 3.0f, -3.0f, -3.0f, 1.0f, 0.0f, 0.0f, }, // side 5
{ 3.0f, 3.0f, -3.0f, 1.0f, 0.0f, 0.0f, },
{ 3.0f, -3.0f, 3.0f, 1.0f, 0.0f, 0.0f, },
{ 3.0f, 3.0f, 3.0f, 1.0f, 0.0f, 0.0f, },
{ -3.0f, -3.0f, -3.0f, -1.0f, 0.0f, 0.0f, }, // side 6
{ -3.0f, -3.0f, 3.0f, -1.0f, 0.0f, 0.0f, },
{ -3.0f, 3.0f, -3.0f, -1.0f, 0.0f, 0.0f, },
{ -3.0f, 3.0f, 3.0f, -1.0f, 0.0f, 0.0f, },
};
// create a vertex buffer interface called v_buffer
d3ddev->CreateVertexBuffer(24*sizeof(CUSTOMVERTEX),
0,
CUSTOMFVF,
D3DPOOL_MANAGED,
&v_buffer,
NULL);
VOID* pVoid; // a void pointer
// lock v_buffer and load the vertices into it
v_buffer->Lock(0, 0, (void**)&pVoid, 0);
memcpy(pVoid, vertices, sizeof(vertices));
v_buffer->Unlock();
// create the indices using an int array
short indices[] =
{
0, 1, 2, // side 1
2, 1, 3,
4, 5, 6, // side 2
6, 5, 7,
8, 9, 10, // side 3
10, 9, 11,
12, 13, 14, // side 4
14, 13, 15,
16, 17, 18, // side 5
18, 17, 19,
20, 21, 22, // side 6
22, 21, 23,
};
// create an index buffer interface called i_buffer
d3ddev->CreateIndexBuffer(36*sizeof(short),
0,
D3DFMT_INDEX16,
D3DPOOL_MANAGED,
&i_buffer,
NULL);
// lock i_buffer and load the indices into it
i_buffer->Lock(0, 0, (void**)&pVoid, 0);
memcpy(pVoid, indices, sizeof(indices));
i_buffer->Unlock();
}
// this is the function that sets up the lights and materials
void init_light(void)
{
D3DLIGHT9 light; // create the light struct
D3DMATERIAL9 material; // create the material struct
ZeroMemory(&light, sizeof(light)); // clear out the light struct for use
light.Type = D3DLIGHT_DIRECTIONAL; // make the light type 'directional light'
light.Diffuse = D3DXCOLOR(0.5f, 0.5f, 0.5f, 1.0f); // set the light's color
light.Direction = D3DXVECTOR3(-1.0f, -0.3f, -1.0f);
d3ddev->SetLight(0, &light); // send the light struct properties to light #0
d3ddev->LightEnable(0, TRUE); // turn on light #0
ZeroMemory(&material, sizeof(D3DMATERIAL9)); // clear out the struct for use
material.Diffuse = D3DXCOLOR(1.0f, 1.0f, 1.0f, 1.0f); // set diffuse color to white
material.Ambient = D3DXCOLOR(1.0f, 1.0f, 1.0f, 1.0f); // set ambient color to white
d3ddev->SetMaterial(&material); // set the globably-used material to &material
}
If you run this code, you should get something like this.
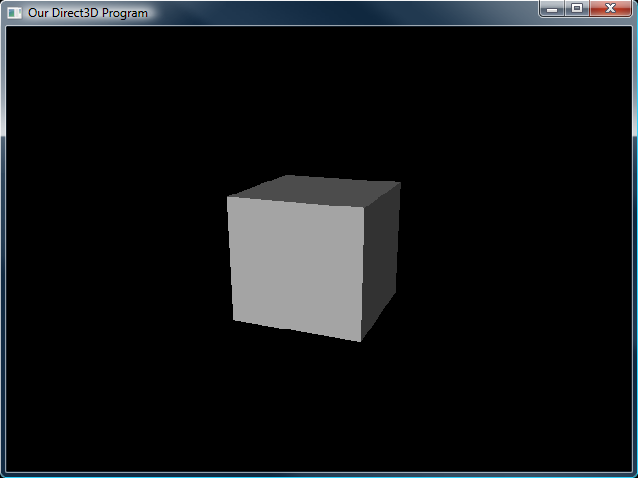
A Lit Cube Lighting is a very important part of 3D game programming. Without it, worlds just look fake. Lighting helps to bring the realism out and make it a more enjoyable experience.
Although you have learned the very basics of lighting, there is much, much more to the subject. We have more types of lighting and light sources to learn about. These will be covered next, and it will become easier. In the meantime, I suggest these exercises:
1. Make the cube red, but have it look realistic under colored lighting.
2. Make two directional-lights, giving an extra effect.
3. Try toggling the light and see what happens.
4. Have the direction of the light rotate in a circle.
5. If you dare, recreate the Hypercraft from Lesson 7, complete with vertex normals!
6. As an experiment, try scaling an object with light on it. It will produce an odd effect.
Once you're done, it's time to move onward. DirectX has only begun!
Next Lesson: More on Lighting
GO! GO! GO!
© 2006-2026 DirectXTutorial.com. All Rights Reserved.
Expand