Because of the flexibility of color blending, DirectX requires that you specify exactly how you want your blending to be done. To do this, DirectX uses what is called a blend operation. A blend operation is simply an equation with two unknown values which, when filled, produce a third value. If you fill the two values with color, the third color is some combination of the two you provided.
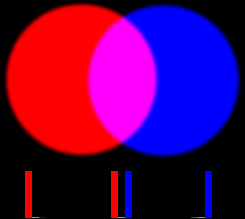
Red and Blue Added TogetherAs you can see, each red, green and blue value from both colors were run through the equation, blended, and a new set of primary colors was produced. This is the basis of all color blending. Now let's look at this in detail.
A blend operation (or blend equation) has five parts: the source color, the source factor, the operation, the destination color and the destination factor. Let's take a look at the whole equation, then go into each of the parts in detail.
Final Color = (Source Color x Source Factor) Operation (Dest Color x Dest Factor)
Color blending takes place when you draw on object onto the back buffer. This equation is run for each pixel drawn. The source color is the color of the pixel that is being drawn, while the destination color is the color of the pixel that was behind the one drawn, like this:
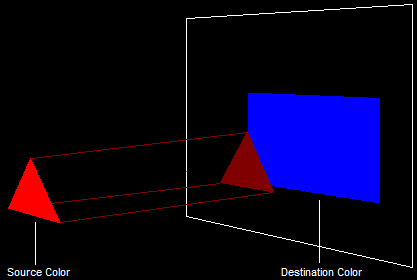
Source Color and Destination ColorThe values of these colors are automatically set based on what you are drawing, and nothing need be done for Direct3D to set these values.
In color blending, each primary color is multiplied by some pre-determined factor. While this can get quite complex, building a simple color blend is quite simple. Before you begin rendering, you tell Direct3D what it should use for these factors. Usually, you will use an object's Alpha channel. We'll go over how this is done in a moment.
When you select what factor is to be used, Direct3D always translates that value into a FLOAT between 0.0 and 1.0.
In color blending, each primary color is multiplied by some other number between 0.0 and 1.0. Where that number comes from, you will determine (we'll go over how in the next section).
For example, if you were to create a semi-transparency effect, you might use a model's alpha channel. The alpha channel (which is a value between 0 and 255) gets translated into a value between 0.0 (fully transparent) and 1.0 (fully opaque). The color is then multiplied by new number. If the alpha were 192 (or .75 once translated), then the color would show at 75 of its usual brightness. All you would then have to do is add 25 of whatever was behind that (we'll go over this in a bit as well)
In addition to the source factor and the destination factor, you are also able to set the overall operation used between the source and the destination. Available settings for this are addition, subtraction, minimum (the darker of the two colors) and maximum (the brighter of the two colors).
Enough! Let's get on with the code. section Using Color Blending
Blending colors is quite simple in practice, and only takes a few lines of code. This lesson happens to be oriented around semi-transparency, and these are the steps taken to achieve this effect:
1. Turn on Blending
2. Set the Operation for the Blend Equation
3. Set the Source and Destination Factors
4. Set the Alpha Values in the 3D Model
Before any color blending can be done, Direct3D must be informed. This is a simple call to the ever-useful SetRenderState() function, like so:
d3ddev->SetRenderState(D3DRS_ALPHABLENDENABLE, TRUE);
Setting the parameters to D3DRS_ALPHABLENDENABLE and TRUE turns on color blending.
This step is also simple, and requires another call to SetRenderState(). This time, the parameters are a little more flexible.
d3ddev->SetRenderState(D3DRS_ALPHABLENDENABLE, TRUE);
d3ddev->SetRenderState(D3DRS_BLENDOP, D3DBLENDOP_ADD);
The first parameter is D3DRS_BLENDOP, which indicates that we are going to set the operation. The second parameter tells what operation we are setting it to. The various values you can put into this parameter are listed here:
| Value | Description |
|---|
| D3DBLENDOP_ADD | This is the one we'll use in this lesson. This indicates that the destination color will be added to the source color. |
| D3DBLENDOP_SUBTRACT | This indicates that the destination will be subtracted from the source. |
| D3DBLENDOP_REVSUBTRACT | This indicates the reverse of regular subtraction, that the source will be subtracted from the destination. |
| D3DBLENDOP_MIN | This indicates that the darker of the two colors will be used. Note that this is done to each primary color separately, not to the whole color. |
| D3DBLENDOP_MAX | This indicates that the brighter of the two colors will be used. |
Here, we have to make two calls to SetRenderState(), once for each factor. To set the source factor, we use the flag D3DRS_SRCBLEND in parameter 1. Next, we set the destination factor with D3DRS_DESTBLEND in parameter 1, as shown here:
d3ddev->SetRenderState(D3DRS_ALPHABLENDENABLE, TRUE);
d3ddev->SetRenderState(D3DRS_BLENDOP, D3DBLENDOP_ADD);
d3ddev->SetRenderState(D3DRS_SRCBLEND, D3DBLEND_SRCALPHA);
d3ddev->SetRenderState(D3DRS_DESTBLEND, D3DBLEND_INVSRCALPHA);
Just as with the operation, each factor is flexible, and there are fifteen different options to choose from. Not all of them are listed in this tutorial, as most of them you will never need. However, the most commonly-used values are given here:
| Value | Description |
|---|
| D3DBLEND_SRCALPHA | The factor used is the alpha value of the object being drawn. |
| D3DBLEND_INVSRCALPHA | The factor used is the inverse of the alpha value of the object being drawn. In other words, because the value is between 0.0 and 1.0, this would be equal to 1 - alpha. |
| D3DBLEND_SRCCOLOR | The factor used is the source color. |
| D3DBLEND_INVSRCCOLOR | The factor used is the inverse of the source color. |
| D3DBLEND_DESTCOLOR | The factor used is the destination color. |
| D3DBLEND_INVDESTCOLOR | The factor used is the inverse of the destination color. |
| D3DBLEND_ZERO | The factor used is zero, meaning the color is treated as if it were black. |
| D3DBLEND_ONE | The factor used is one, meaning the color is not changed at all. |
When reviewing the table, note that all the values mentioned there (such as the color and the alpha) start as a value between 0x00 and 0xFF (0 to 255) and get translated to a value between 0.0 and 1.0.
This is the easy step. All we need to do is change the alpha values of each color in whatever object we're going to use. For this lesson, we'll use two squares, one somewhat transparent and the other fully opaque. Also, for simplicity we'll not use index buffers.
Here are the coded vertices:
// create the vertices using the CUSTOMVERTEX struct
CUSTOMVERTEX t_vert[] =
{
// square 1
{ -3.0f, 3.0f, 3.0f, D3DCOLOR_ARGB(255, 0, 0, 255), },
{ -3.0f, -3.0f, 3.0f, D3DCOLOR_ARGB(255, 0, 255, 0), },
{ 3.0f, 3.0f, 3.0f, D3DCOLOR_ARGB(255, 255, 0, 0), },
{ 3.0f, -3.0f, 3.0f, D3DCOLOR_ARGB(255, 0, 255, 255), },
// square 2
{ -3.0f, 3.0f, 3.0f, D3DCOLOR_ARGB(191, 0, 0, 255), },
{ -3.0f, -3.0f, 3.0f, D3DCOLOR_ARGB(191, 0, 245, 0), },
{ 3.0f, 3.0f, 3.0f, D3DCOLOR_ARGB(191, 255, 0, 0), },
{ 3.0f, -3.0f, 3.0f, D3DCOLOR_ARGB(191, 0, 255, 255), },
};
Notice that instead of using the D3DCOLOR_XRGB macro, we're switching to the D3DCOLOR_ARGB macro instead. This one takes four parameters, the first being alpha, and the other three being red, green and blue.
In this example, I've set the alpha for the first square as 191 (3/4 opaque), and for the second square as 255 (full opaque).
And now let's look at the whole program. There are several parts taken out such as lighting and textures, while the transparency code was put in.
Note: I haven't bolded every change in this example, as most of the changes from the last lesson are quite irrelevant here, and are simply there to clean up all the stuff we're getting rid of.
[
Main.cpp]
// include the basic windows header files and the Direct3D header file
#include <windows.h>
#include <windowsx.h>
#include <d3d9.h>
#include <d3dx9.h>
// define the screen resolution
#define SCREEN_WIDTH 800
#define SCREEN_HEIGHT 600
// include the Direct3D Library files
#pragma comment (lib, "d3d9.lib")
#pragma comment (lib, "d3dx9.lib")
// global declarations
LPDIRECT3D9 d3d;
LPDIRECT3DDEVICE9 d3ddev;
LPDIRECT3DVERTEXBUFFER9 v_buffer = NULL;
// function prototypes
void initD3D(HWND hWnd);
void render_frame(void);
void cleanD3D(void);
void init_graphics(void);
struct CUSTOMVERTEX {FLOAT X, Y, Z; DWORD COLOR;};
#define CUSTOMFVF (D3DFVF_XYZ | D3DFVF_DIFFUSE)
// the WindowProc function prototype
LRESULT CALLBACK WindowProc(HWND hWnd, UINT message, WPARAM wParam, LPARAM lParam);
// the entry point for any Windows program
int WINAPI WinMain(HINSTANCE hInstance,
HINSTANCE hPrevInstance,
LPSTR lpCmdLine,
int nCmdShow)
{
HWND hWnd;
WNDCLASSEX wc;
ZeroMemory(&wc, sizeof(WNDCLASSEX));
wc.cbSize = sizeof(WNDCLASSEX);
wc.style = CS_HREDRAW | CS_VREDRAW;
wc.lpfnWndProc = WindowProc;
wc.hInstance = hInstance;
wc.hCursor = LoadCursor(NULL, IDC_ARROW);
wc.lpszClassName = L"WindowClass";
RegisterClassEx(&wc);
hWnd = CreateWindowEx(NULL, L"WindowClass", L"Our Direct3D Program",
WS_OVERLAPPEDWINDOW, 0, 0, SCREEN_WIDTH, SCREEN_HEIGHT,
NULL, NULL, hInstance, NULL);
ShowWindow(hWnd, nCmdShow);
// set up and initialize Direct3D
initD3D(hWnd);
// enter the main loop:
MSG msg;
while(TRUE)
{
while(PeekMessage(&msg, NULL, 0, 0, PM_REMOVE))
{
TranslateMessage(&msg);
DispatchMessage(&msg);
}
if(msg.message == WM_QUIT)
break;
render_frame();
}
cleanD3D();
return msg.wParam;
}
// this is the main message handler for the program
LRESULT CALLBACK WindowProc(HWND hWnd, UINT message, WPARAM wParam, LPARAM lParam)
{
switch(message)
{
case WM_DESTROY:
{
PostQuitMessage(0);
return 0;
} break;
}
return DefWindowProc (hWnd, message, wParam, lParam);
}
// this function initializes and prepares Direct3D for use
void initD3D(HWND hWnd)
{
d3d = Direct3DCreate9(D3D_SDK_VERSION);
D3DPRESENT_PARAMETERS d3dpp;
ZeroMemory(&d3dpp, sizeof(d3dpp));
d3dpp.Windowed = TRUE;
d3dpp.SwapEffect = D3DSWAPEFFECT_DISCARD;
d3dpp.hDeviceWindow = hWnd;
d3dpp.BackBufferFormat = D3DFMT_X8R8G8B8;
d3dpp.BackBufferWidth = SCREEN_WIDTH;
d3dpp.BackBufferHeight = SCREEN_HEIGHT;
d3dpp.EnableAutoDepthStencil = TRUE;
d3dpp.AutoDepthStencilFormat = D3DFMT_D16;
// create a device class using this information and the info from the d3dpp stuct
d3d->CreateDevice(D3DADAPTER_DEFAULT,
D3DDEVTYPE_HAL,
hWnd,
D3DCREATE_SOFTWARE_VERTEXPROCESSING,
&d3dpp,
&d3ddev);
init_graphics(); // call the function to initialize the cube
d3ddev->SetRenderState(D3DRS_LIGHTING, FALSE); // turn off the 3D lighting
d3ddev->SetRenderState(D3DRS_ZENABLE, TRUE); // turn on the z-buffer
d3ddev->SetRenderState(D3DRS_ALPHABLENDENABLE, TRUE); // turn on the color blending
d3ddev->SetRenderState(D3DRS_SRCBLEND, D3DBLEND_SRCALPHA); // set source factor
d3ddev->SetRenderState(D3DRS_DESTBLEND, D3DBLEND_INVSRCALPHA); // set dest factor
d3ddev->SetRenderState(D3DRS_BLENDOP, D3DBLENDOP_ADD); // set the operation
}
// this is the function used to render a single frame
void render_frame(void)
{
d3ddev->Clear(0, NULL, D3DCLEAR_TARGET, D3DCOLOR_XRGB(0, 0, 0), 1.0f, 0);
d3ddev->Clear(0, NULL, D3DCLEAR_ZBUFFER, D3DCOLOR_XRGB(0, 0, 0), 1.0f, 0);
d3ddev->BeginScene();
// select which vertex format we are using
d3ddev->SetFVF(CUSTOMFVF);
// set an ever-increasing float value
static float index = 0.0f; index+=0.03f;
// set the view transform
D3DXMATRIX matView; // the view transform matrix
D3DXMatrixLookAtLH(&matView,
&D3DXVECTOR3 ((float)sin(index) * 20.0f, 2.0f, 25.0f), // the camera position
&D3DXVECTOR3 (0.0f, 0.0f, 0.0f), // the look-at position
&D3DXVECTOR3 (0.0f, 1.0f, 0.0f)); // the up direction
d3ddev->SetTransform(D3DTS_VIEW, &matView); // set the view transform to matView
// set the projection transform
D3DXMATRIX matProjection; // the projection transform matrix
D3DXMatrixPerspectiveFovLH(&matProjection,
D3DXToRadian(45), // the horizontal field of view
(FLOAT)SCREEN_WIDTH / (FLOAT)SCREEN_HEIGHT, // aspect ratio
1.0f, // the near view-plane
100.0f); // the far view-plane
d3ddev->SetTransform(D3DTS_PROJECTION, &matProjection); // set the projection
// set the stream source
d3ddev->SetStreamSource(0, v_buffer, 0, sizeof(CUSTOMVERTEX));
// set the first world transform
D3DXMATRIX matTranslate;
D3DXMatrixTranslation(&matTranslate, 0.0f, 0.0f, -10.0f);
d3ddev->SetTransform(D3DTS_WORLD, &(matTranslate)); // set the world transform
// draw the first square
d3ddev->DrawPrimitive(D3DPT_TRIANGLESTRIP, 0, 2);
// set the second world transform
D3DXMatrixTranslation(&matTranslate, 0.0f, 0.0f, 0.0f);
d3ddev->SetTransform(D3DTS_WORLD, &(matTranslate)); // set the world transform
// draw the second square
d3ddev->DrawPrimitive(D3DPT_TRIANGLESTRIP, 4, 2);
d3ddev->EndScene();
d3ddev->Present(NULL, NULL, NULL, NULL);
}
// this is the function that cleans up Direct3D and COM
void cleanD3D(void)
{
v_buffer->Release(); // close and release the vertex buffer
d3ddev->Release(); // close and release the 3D device
d3d->Release(); // close and release Direct3D
}
// this is the function that puts the 3D models into video RAM
void init_graphics(void)
{
// create the vertices using the CUSTOMVERTEX struct
CUSTOMVERTEX vertices[] =
{
// square 1
{ -3.0f, 3.0f, 3.0f, D3DCOLOR_ARGB(255, 0, 0, 255), },
{ -3.0f, -3.0f, 3.0f, D3DCOLOR_ARGB(255, 0, 255, 0), },
{ 3.0f, 3.0f, 3.0f, D3DCOLOR_ARGB(255, 255, 0, 0), },
{ 3.0f, -3.0f, 3.0f, D3DCOLOR_ARGB(255, 0, 255, 255), },
// square 2
{ -3.0f, 3.0f, 3.0f, D3DCOLOR_ARGB(192, 0, 0, 255), },
{ -3.0f, -3.0f, 3.0f, D3DCOLOR_ARGB(192, 0, 255, 0), },
{ 3.0f, 3.0f, 3.0f, D3DCOLOR_ARGB(192, 255, 0, 0), },
{ 3.0f, -3.0f, 3.0f, D3DCOLOR_ARGB(192, 0, 255, 255), },
};
// create a vertex buffer interface called v_buffer
d3ddev->CreateVertexBuffer(8 * sizeof(CUSTOMVERTEX),
0,
CUSTOMFVF,
D3DPOOL_MANAGED,
&v_buffer,
NULL);
VOID* pVoid; // a void pointer
// lock v_buffer and load the vertices into it
v_buffer->Lock(0, 0, (void**)&pVoid, 0);
memcpy(pVoid, vertices, sizeof(vertices));
v_buffer->Unlock();
}
This code is quite straightforward, without all the additional lighting and texture code included. If you run this, you should get something like this:
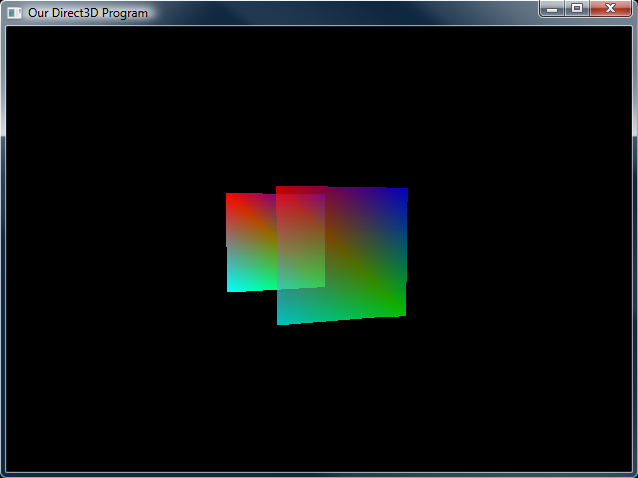
Alpha Squares in Action That isn't all there is to color blending. There are fifteen different flags that you can plug into the source factor and the destination factor, not to mention the five different operations. This leaves you with 1125 different combinations of color blending. Of course, many do the same as other combinations, but there is still quite a bit to play around with.
Therefore, before going on, try doing these for exercises:
1. Make the front square have 25% transparency.
2. Study the tables above and concoct your very own alpha blend. See if it does what you expected!
3. Try making both objects transparent, and switching their positions and see what happens.
Congratulations! You now know the basics of Direct3D programming! But in case this worried you, never fear, for the adventure has only just begun!
Next Lesson: Adding Textures
GO! GO! GO!
