Once Direct3D is initialized, it's time to start doing some actual rendering. Rendering itself is very easy, but there is a little bit of preparatory work involved. In this lesson we're going to get everything set up to render a blank frame, over and over again.
The setup involved is simple. There are two things that need to be done. First, we need to tell the GPU where in memory to create the final image (for us, this is the back buffer). Second, we need to tell the GPU where on the backbuffer it should draw.
Once that's done, we can render, and man is it easy.
Let's start with where to render to. Now logically you would say, "the backbuffer, duh!" and be done. However, Direct3D doesn't actually know that at this point. It is possible that you do not want to render to the back buffer right away. For example many games render to the surface of a model, then render that model to the back buffer. This technique can produce a variety of effects. If you have played the game Portal you will have seen an example of this. In Portal, the game engine first renders to the portal, then renders a full scene with the portal image included.
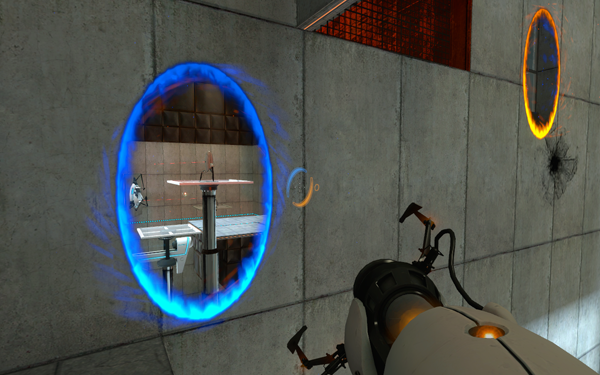
Rendering to a Portal, and Rendering to the Back BufferWhen rendering in Direct3D, you must establish the render target. This is a simple COM object that maintains a location in video memory for you to render into. In most cases (including our case) this is the back buffer.
Here's how we do it:
ID3D11RenderTargetView *backbuffer; // global declaration
// this function initializes and prepares Direct3D for use
void InitD3D(HWND hWnd)
{
// Direct3D initialization
// ...
// get the address of the back buffer
ID3D11Texture2D *pBackBuffer;
swapchain->GetBuffer(0, __uuidof(ID3D11Texture2D), (LPVOID*)&pBackBuffer);
// use the back buffer address to create the render target
dev->CreateRenderTargetView(pBackBuffer, NULL, &backbuffer);
pBackBuffer->Release();
// set the render target as the back buffer
devcon->OMSetRenderTargets(1, &backbuffer, NULL);
}
Whoa. It looks complex, but it's pretty simple.
There are three things being done here. First, we determine the address of the back buffer. Second, we create a COM object using that address to represent the render target. Third, we set that object as the active render target.
There's some new code here, so let's find out what it all means.
This variable is a pointer to an object that holds all the information about the render target. We'll be rendering to the back buffer, so we'll call this variable 'backbuffer'.
In 3D rendering, a texture is another name for an image. An ID3D11Texture2D is an object that stores a flat image. Like any COM object, we first define the pointer, and later a function creates the object for us.
You may not believe me, but this command is actually simple. What this GetBuffer() function does is find the back buffer on the swap chain and use it to create the pBackBuffer texture object.
The first parameter is the number of the back buffer to get. We are only using one back buffer on this chain, and it is back buffer #0. Therefore, the first parameter will be 0.
The second parameter is a number identifying the ID3D11Texture2D COM object. Each type of COM object has its own unique ID that is used to get information about it. To get this ID, we must use the __uuidof operator. The exact details of how this works are unimportant, but the reason we do it is so that the GetBuffer() function knows what type of object it is supposed to be creating.
The third parameter may not make sense to you unless you are at least intermediate with C++. Basically a void* is a pointer that points to no particular type of variable. For example, a double* points to a double, whereas an int* points to an int. A void* is used to point to anything, and it can be converted to any other type of pointer.
In this third parameter, we have a pointer to a void*. This void* gets filled with the location of the ID3D11Texture2D object. It needs to be a void* because there are other types of objects we could be asking for.
This particular function is one that you won't be messing around with too much, so don't worry if it's a little bit shrowded in mystery right now. You'll have an easier time getting it as you learn more about Direct3D.
This function creates the render target object. We created the pointer for this object at the top of the program.
The first parameter is a pointer to the texture. It should be 'pBackBuffer' for our program.
The second parameter is a struct that describes the render target. We won't need to fill this out for the back buffer. We'll just set it to NULL.
The third parameter is the address of the object pointer. The pointer name was 'backbuffer', so we'll use '&backbuffer'.
The Release() function frees all memory and closes all threads used by a COM object. We are done with the pBackBuffer object, so we will Release() it. Note that this doesn't destroy the back buffer, it only closes the texture object we used to access it.
This last function actually sets the render target. More exactly, it sets multiple render targets.
The first parameter is the number of render targets to set. This will usually be 1, but there are cases where it will be more.
The second parameter is a pointer to a list of render target view objects. We only have one, so it's just the address of our render target object (&backbuffer).
The third parameter is advanced, and we'll get into it in a later lesson. For now it can be NULL.
This section of code is a bit complex. Make sure you go over it until you get what is happening, because it will be used and modified many times in your Direct3D programming.
This section of code will be a piece of cake compared to the last one.
A viewport is a way of translating pixel coordinates to normalized coordinates. The following diagram shows the difference between the two.
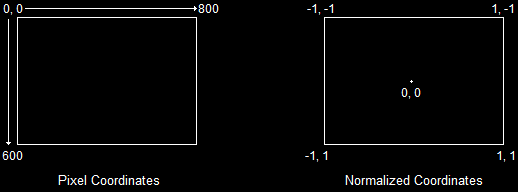
Pixel Coordinates and Normalized CoordinatesOn the left, pixel coordinates start at 0, 0 in the upper-left corner, and increase one pixel at a time. On the right, normalized coordinates start at -1, -1 and increase to 1, 1, no matter the size of the back buffer. The word normalized means that a value is adjusted until it equals 1.
What -1, -1 and 1, 1 actually equate to is determined by the viewport. The viewport is a struct that lets us set where -1, -1 and 1, 1 will be in pixel coordinates.
Here's what the code to set the viewport looks like:
// this function initializes and prepares Direct3D for use
void InitD3D(HWND hWnd)
{
// Direct3D initialization
// ...
// Set the render target
// ...
// Set the viewport
D3D11_VIEWPORT viewport;
ZeroMemory(&viewport, sizeof(D3D11_VIEWPORT));
viewport.TopLeftX = 0;
viewport.TopLeftY = 0;
viewport.Width = 800;
viewport.Height = 600;
devcon->RSSetViewports(1, &viewport);
}
Probably the only line here that needs explanation is the last one.
RSSetViewports() is a function that activates viewport structs. The first parameter is the number of viewports being used, and the second parameter is the address of a list of pointers to the viewport structs.
Using multiple viewports is handy in certain advanced situations, but we won't get into them here. For now, 1 and '&viewport' will suit the parameters fine.
Next we'll create a function that renders a single frame. The frame will be rather simple for now, and will consist only of a blue background. Of course, you can change the color if you want. Here is the code for this function.
// this is the function used to render a single frame
void RenderFrame(void)
{
// clear the back buffer to a deep blue
devcon->ClearRenderTargetView(backbuffer, D3DXCOLOR(0.0f, 0.2f, 0.4f, 1.0f));
// do 3D rendering on the back buffer here
// switch the back buffer and the front buffer
swapchain->Present(0, 0);
}
Nice! A whopping two lines of code! Let's talk about what they do.
This fills a render target buffer with a specific color. In our case, we are going to fill our back buffer. It's pretty simple. There are two parameters.
The first one is the address of the render target object. We just put 'backbuffer' here.
The second parameter is the color you want to fill the back buffer with. To do this, we use a simple struct called D3DXCOLOR. The four constructor parameters are used to build the color. The first three are the red, green and blue values, and the fourth is the alpha value (which is meaningless on a backbuffer, but necessary as we'll see later on).
Next we call the Present() function. This function is where everything that has been drawn on the back buffer actually appears. It's job is basically to perform the "swap" in the swap chain, so that the back buffer becomes the front buffer.
The two parameters, both set to 0, are not going to be used much in this tutorial.
In the last lesson we closed down Direct3D by releasing each COM object we created. Most COM objects have this Release() function, and if they do, we must call it when we're done. The render target object is no exception.
// this is the function that cleans up Direct3D and COM
void CleanD3D()
{
// close and release all existing COM objects
swapchain->Release();
backbuffer->Release();
dev->Release();
devcon->Release();
}
Get into the habit of ensuring that all COM objects are released. The more we add, the easier it can be to forget one.
Excellent! We've got Direct3D running and we've got a simple, blank frame rendering into a window. We're making good progress.
Below, I've added in the new code. Take a look over it, and go ahead and run the new program.
[
Main.cpp]
// include the basic windows header files and the Direct3D header files
#include <windows.h>
#include <windowsx.h>
#include <d3d11.h>
#include <d3dx11.h>
#include <d3dx10.h>
// include the Direct3D Library file
#pragma comment (lib, "d3d11.lib")
#pragma comment (lib, "d3dx11.lib")
#pragma comment (lib, "d3dx10.lib")
// global declarations
IDXGISwapChain *swapchain; // the pointer to the swap chain interface
ID3D11Device *dev; // the pointer to our Direct3D device interface
ID3D11DeviceContext *devcon; // the pointer to our Direct3D device context
ID3D11RenderTargetView *backbuffer; // the pointer to our back buffer
// function prototypes
void InitD3D(HWND hWnd); // sets up and initializes Direct3D
void RenderFrame(void); // renders a single frame
void CleanD3D(void); // closes Direct3D and releases memory
// the WindowProc function prototype
LRESULT CALLBACK WindowProc(HWND hWnd, UINT message, WPARAM wParam, LPARAM lParam);
// the entry point for any Windows program
int WINAPI WinMain(HINSTANCE hInstance,
HINSTANCE hPrevInstance,
LPSTR lpCmdLine,
int nCmdShow)
{
HWND hWnd;
WNDCLASSEX wc;
ZeroMemory(&wc, sizeof(WNDCLASSEX));
wc.cbSize = sizeof(WNDCLASSEX);
wc.style = CS_HREDRAW | CS_VREDRAW;
wc.lpfnWndProc = WindowProc;
wc.hInstance = hInstance;
wc.hCursor = LoadCursor(NULL, IDC_ARROW);
wc.hbrBackground = (HBRUSH)COLOR_WINDOW;
wc.lpszClassName = L"WindowClass";
RegisterClassEx(&wc);
RECT wr = {0, 0, 800, 600};
AdjustWindowRect(&wr, WS_OVERLAPPEDWINDOW, FALSE);
hWnd = CreateWindowEx(NULL,
L"WindowClass",
L"Our First Direct3D Program",
WS_OVERLAPPEDWINDOW,
300,
300,
wr.right - wr.left,
wr.bottom - wr.top,
NULL,
NULL,
hInstance,
NULL);
ShowWindow(hWnd, nCmdShow);
// set up and initialize Direct3D
InitD3D(hWnd);
// enter the main loop:
MSG msg;
while(TRUE)
{
if(PeekMessage(&msg, NULL, 0, 0, PM_REMOVE))
{
TranslateMessage(&msg);
DispatchMessage(&msg);
if(msg.message == WM_QUIT)
break;
}
RenderFrame();
}
// clean up DirectX and COM
CleanD3D();
return msg.wParam;
}
// this is the main message handler for the program
LRESULT CALLBACK WindowProc(HWND hWnd, UINT message, WPARAM wParam, LPARAM lParam)
{
switch(message)
{
case WM_DESTROY:
{
PostQuitMessage(0);
return 0;
} break;
}
return DefWindowProc (hWnd, message, wParam, lParam);
}
// this function initializes and prepares Direct3D for use
void InitD3D(HWND hWnd)
{
// create a struct to hold information about the swap chain
DXGI_SWAP_CHAIN_DESC scd;
// clear out the struct for use
ZeroMemory(&scd, sizeof(DXGI_SWAP_CHAIN_DESC));
// fill the swap chain description struct
scd.BufferCount = 1; // one back buffer
scd.BufferDesc.Format = DXGI_FORMAT_R8G8B8A8_UNORM; // use 32-bit color
scd.BufferUsage = DXGI_USAGE_RENDER_TARGET_OUTPUT; // how swap chain is to be used
scd.OutputWindow = hWnd; // the window to be used
scd.SampleDesc.Count = 1; // how many multisamples
scd.SampleDesc.Quality = 0; // multisample quality level
scd.Windowed = TRUE; // windowed/full-screen mode
// create a device, device context and swap chain using the information in the scd struct
D3D11CreateDeviceAndSwapChain(NULL,
D3D_DRIVER_TYPE_HARDWARE,
NULL,
NULL,
NULL,
NULL,
D3D11_SDK_VERSION,
&scd,
&swapchain,
&dev,
NULL,
&devcon);
// get the address of the back buffer
ID3D11Texture2D *pBackBuffer;
swapchain->GetBuffer(0, __uuidof(ID3D11Texture2D), (LPVOID*)&pBackBuffer);
// use the back buffer address to create the render target
dev->CreateRenderTargetView(pBackBuffer, NULL, &backbuffer);
pBackBuffer->Release();
// set the render target as the back buffer
devcon->OMSetRenderTargets(1, &backbuffer, NULL);
// Set the viewport
D3D11_VIEWPORT viewport;
ZeroMemory(&viewport, sizeof(D3D11_VIEWPORT));
viewport.TopLeftX = 0;
viewport.TopLeftY = 0;
viewport.Width = 800;
viewport.Height = 600;
devcon->RSSetViewports(1, &viewport);
}
// this is the function used to render a single frame
void RenderFrame(void)
{
// clear the back buffer to a deep blue
devcon->ClearRenderTargetView(backbuffer, D3DXCOLOR(0.0f, 0.2f, 0.4f, 1.0f));
// do 3D rendering on the back buffer here
// switch the back buffer and the front buffer
swapchain->Present(0, 0);
}
// this is the function that cleans up Direct3D and COM
void CleanD3D(void)
{
// close and release all existing COM objects
swapchain->Release();
backbuffer->Release();
dev->Release();
devcon->Release();
}
Now that we've got a frame rendering, we should get a blue window!
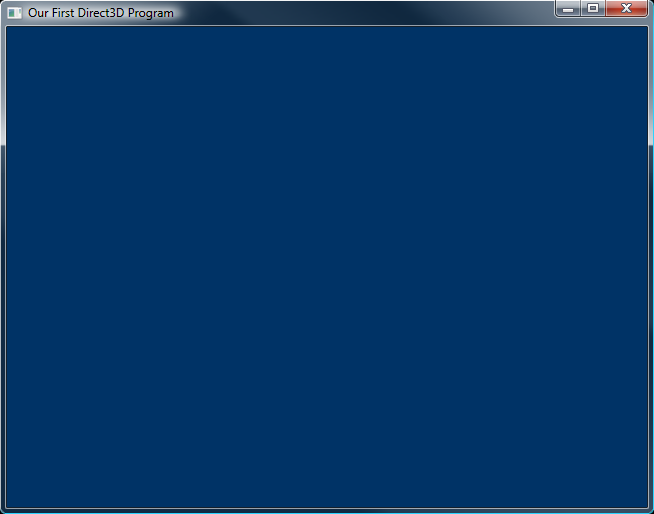
Our Direct3D Program, Now in Color Once again, let's look at what we've learned and find out if we're ready to move on.
1. What is a render target? What function creates the render target?
2. What two functions render the blank, blue frame? What do these functions do exactly?
3. What are normalized coordinates?
1. See if you can get your program to change colors while running. Make it fade from blue to black.
2. Change the viewport and see what "happens". We'll discuss why this is in a few lessons.
Next Lesson: Going Fullscreen
GO! GO! GO!
© 2006-2026 DirectXTutorial.com. All Rights Reserved.
Expand