This lesson will cover how to build a basic Windows application that is ready for DirectX. We'll start by constructing a Direct3D project and walking through the basic steps to get a working application.
If this is your first time through this code, note that it is not expected that you remember every line of code we go over here. You may, after some time programming, be able to remember them without reference. But for now, know that if you cannot remember the code in the next four lessons, it does not mean you are stupid. ;)
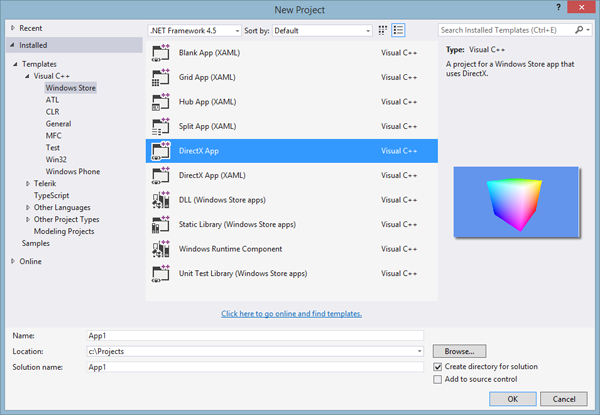
Before we start, we have to create a project. To build a DirectX "non-desktop" application, a special type of project is used, called a "DirectX App".
Open Visual Studio 2013, select File > New Project, and select "DirectX App" under Visual C++, Windows Store.
A New Direct3D AppOnce the project is created, you'll see a lot of files already populating it. We won't need these just now. You'll find them useful later on, but for now most of it will just get in our way.
So we'll start by deleting all the files listed except four of them. Also leave the contents of the Assets folder.
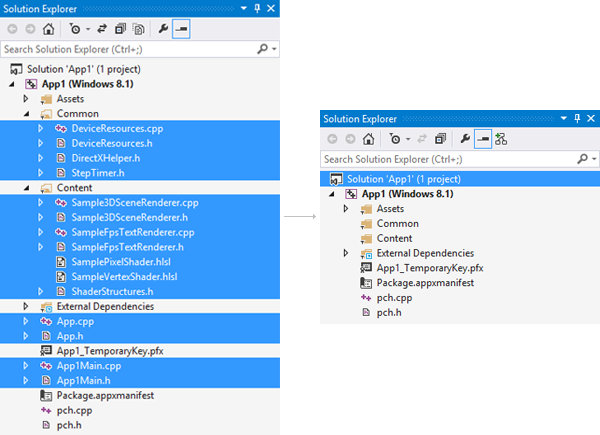
An "Empty" Direct3D AppThe files deleted here make up a sample app you can explore on your own to see how a fully-functioning DirectX app could be set up.
Finally, we'll create a single source file to start out with. I typically name this "App.cpp".
Following is a code sample of a simple 'Hello World!' demo for a Win32 Console Application.
#include <stdio.h> // include the standard input/output header file
int main(void) // our program starts here
{
printf("Hello World!"); // print "Hello World!" into the console
return 0; // return 0 to windows
}
As you most likely are aware, the function main() is used here to start the application and work with Windows. Simply put, main() is where your program starts, and Windows can feed to your program any parameters you decide might be necessary. Of course, there are specific parameters which can be put in here, but we aren't concerned with these and won't be in any of these tutorials.
A WinRT program, however, is quite a bit more complex than this. We still use the main() function, but there's much more to do before we can get a working program.
Following is a program which contains the code to build and run a window. If you can understand the program from the comments, great. If not, don't worry. I'll explain everything right afterward.
// Include the precompiled headers
#include "pch.h"
// Use some common namespaces to simplify the code
using namespace Windows::ApplicationModel;
using namespace Windows::ApplicationModel::Core;
using namespace Windows::ApplicationModel::Activation;
using namespace Windows::UI::Core;
using namespace Windows::UI::Popups;
using namespace Windows::System;
using namespace Windows::Foundation;
using namespace Windows::Graphics::Display;
using namespace Platform;
// the class definition for the core "framework" of our app
ref class App sealed : public IFrameworkView
{
public:
// some functions called by Windows
virtual void Initialize(CoreApplicationView^ AppView)
{
// set the OnActivated function to handle to Activated "event"
AppView->Activated += ref new TypedEventHandler
<CoreApplicationView^, IActivatedEventArgs^>(this, &App::OnActivated);
}
virtual void SetWindow(CoreWindow^ Window) {}
virtual void Load(String^ EntryPoint) {}
virtual void Run() {}
virtual void Uninitialize() {}
// an "event" that is called when the application window is ready to be activated
void OnActivated(CoreApplicationView^ CoreAppView, IActivatedEventArgs^ Args)
{
CoreWindow^ Window = CoreWindow::GetForCurrentThread();
Window->Activate();
}
};
// the class definition that creates an instance of our core framework class
ref class AppSource sealed : IFrameworkViewSource
{
public:
virtual IFrameworkView^ CreateView()
{
return ref new App(); // create an App class and return it
}
};
[MTAThread] // define main() as a multi-threaded-apartment function
// the starting point of all programs
int main(Array<String^>^ args)
{
CoreApplication::Run(ref new AppSource()); // create and run a new AppSource class
return 0;
}
Whoa! That's quite a bit of code for a program that doesn't do anything. Let's go ahead and run this program and see what happens before we go into details. Copy the above code into App.cpp and press F5. When you run it, it should open, briefly show a splash screen, then close again and return you to the Start screen.

Our First Windows 8 AppAll right, I admit that the program we just wrote is not the easiest to remember straight off. Fortunately, you won't need to. The code you saw doesn't change too much from here on. We'll add a few bits in the next lesson, and a bit more here and there as needed, but for now, let's learn what each part of it does.
We can take the code in the program above and simplify it down to a few pieces of pseudocode:
class App : IFrameworkView
{
// some functions called by Windows
// ...
// ...
};
class AppSource : IFrameworkViewSource
{
// a function that creates an instance of App
};
int main()
{
// create an instance of AppSource
return 0;
}
Well, if you look at it that way it's actually pretty simple!
Let's start with main().
Our main() function has a couple parts to it that may or may not be obvious to you, so it seems best to go ahead and explain each one in detail.
[MTAThread]
int main(Array<String^>^ args)
{
CoreApplication::Run(ref new AppSource());
return 0;
}
Before we get into main() itself, let's look at something just before it: MTAThread. MTAThread stands for Multi-Threaded Apartment Thread, and it is a way of handling threads.
The foundations of DirectX were written a long time ago, back when multithreading was not so common. The various components of DirectX had a hard time working with multiple threads at all. In order to make multithreading possible, the foundations were altered to use what we call the Multi-Threaded Apartment model. It allows the components of DirectX to work well together in a multithreaded environment.
The details of this are not particularly important to us. Windows 8 requires DirectX to run in multithreaded apartment mode, and placing [MTAThread] before main() forces our app to use this mode.
What are these (^) symbols doing here?
This symbol is called a handle declarator, or more commonly hat. It's a different type of pointer than normally used in c++.
If you're unfamiliar with hats or what they mean, here is a quick tutorial on them.
We have two reference class types here: a String and an Array. The String is just that, a string. But it's a special, WinRT-style string. The Array is also self-explanatory.
Simply put, this parameter is an array of strings.
Accessing this parameter is almost like accessing a normal array, but with a few small differences:
int main (Array<String^>^ args)
{
for(int i = 0; i < args->Length; i++) // args->Length shows the length of the array
String^ temp = args[i];
...
}
This parameter isn't important to us in this tutorial, so I'll let you explore it on your own.
And this is all we're going to put inside main(). Yep, one function.
What it does is run an instance of our AppSource class, which we'll talk about in a moment.
The one parameter of this function is a pointer to an instance of AppSource.
Here, we create a new instance of AppSource and pass it to Run(). That's all. If ref new is unfamiliar to you, make sure you go back and do that quick hat tutorial I mentioned before. ;)
The vast majority of our main() function was devoted to creating this AppSource class. What is it?
AppSource is actually our own made up class name. It is a class that inherits IFrameworkViewSource.
And what is that?
IFrameworkViewSource is a simple WinRT class. Its entire job is to set up our application with Windows, and to prepare a second class, IFrameworkView. Fortunately IFrameworkViewSource will do most of the work for us.
ref class AppSource sealed : IFrameworkViewSource
{
};
There is one function in this class that we must write. We must override the virtual function CreateView().
ref class AppSource sealed : IFrameworkViewSource
{
public:
virtual IFrameworkView^ CreateView()
{
}
};
All this function needs to do is create an instance of the IFrameworkView class and return it. IFrameworkView is a reference class, so we use the hat to indicate its pointer.
But we're not going to do quite that. Instead we are going to create a class that inherits IFrameworkView and return that instead.
I've decided the name of the class is App.
ref class AppSource sealed : IFrameworkViewSource
{
public:
virtual IFrameworkView^ CreateView()
{
return ref new App();
}
};
And that's it. Simple.
So what's happening here?
First, we create this class and pass it to CoreApplication::Run() inside main().
Then, IFrameworkViewSource does a bunch of stuff behind the scenes and makes a call to CreateView().
Finally, inside CreateView() we initialize an instance of App and return it.
The job of this class is a bit more complex. This class is our gateway to all things Windows. If Windows wants to let us know something (such as the window being closed or resized), it tells us through this class. This class is also where we will prepare DirectX and make calls to it.
Like AppSource, we are going to inherit App from another class: IFrameworkView.
ref class App sealed : public IFrameworkView
{
};
Unlike AppSource, this class does not have a function to override. It has five.
ref class App sealed : public IFrameworkView
{
virtual void Initialize(CoreApplicationView^ AppView) {}
virtual void SetWindow(CoreWindow^ Window) {}
virtual void Load(String^ EntryPoint) {}
virtual void Run() {}
virtual void Uninitialize() {}
};
Like CreateView(), these functions are all called behind the scenes. We just have to write the functions themselves.
But first, let's look at what the functions are and when they are called.
This function is called when the App class is first created. It gives us a chance to prepare our application before it really gets going.
The parameter, CoreApplicationView^ AppView, is an instance of a class that gives us access to some low-level application properties and notifications. We'll talk about this more in a bit.
This function is called right after Initialize(), and it gives us the opportunity to set up window notifications, such as keystrokes, mouse movements, and touchscreen interactions.
We'll talk about this function more in the next lesson.
Next, the Load() function is called. Generally speaking, this is a good place to prepare DirectX. We can do things like load graphics and sound effects, and allocate memory.
This function is where the magic happens. Here is where most of your program's code resides. We'll put some code in here in the next lesson.
This last function is where you clean up any memory you allocated during the Load() function.
Once we've created the framework for our application (IFrameworkView, or App), the next step is to create a window. Creating a window is fairly simple, but still takes a couple steps.
1. Write a function that creates a window.
2. Tell our App class to call this function when ready.
Let's start with the function. I've called it OnActivated() because this function will be called as soon as the window is ready to be activated. We should add OnActivated() as a public function in our App class, like so:
ref class App sealed : public IFrameworkView
{
virtual void Initialize(CoreApplicationView^ AppView) {}
virtual void SetWindow(CoreWindow^ Window) {}
virtual void Load(String^ EntryPoint) {}
virtual void Run() {}
virtual void Uninitialize() {}
void OnActivated()
{
}
};
When the function is called, the App class will expect certain parameters:
void OnActivated(CoreApplicationView^ CoreAppView, IActivatedEventArgs^ Args)
{
}
The first parameter, CoreApplicationView^, is the same parameter found in the Initialize() function.
The second parameter, IActivatedEventArgs^, is a parameter that will give us useful information about the circumstances under which the function was called (remember, we aren't calling it).
Now we're going to ignore both parameters and just create the window.
void OnActivated(CoreApplicationView^ CoreAppView, IActivatedEventArgs^ Args)
{
// Obtain a pointer to the window
CoreWindow^ Window = CoreWindow::GetForCurrentThread();
// Activate the window
Window->Activate();
}
I think you can guess what the second line does. The first one is a bit more cryptic.
CoreWindow::GetForCurrentThread() is a simple function that returns a hat pointer to the window. The window itself is already "created", but just needs to be activated.
Once we have obtained the pointer, we call Activate() on that pointer, and the window appears!
How does our App class know what function to call? Guesswork? No. We have to give it a function pointer to follow. The function will, naturally, point to OnActivated().
To perform this step, we add a single line of code into the Initialize() function.
virtual void Initialize(CoreApplicationView^ AppView)
{
// Call OnActivated() when the Activated event is triggered
AppView->Activated += ref new TypedEventHandler
<CoreApplicationView^, IActivatedEventArgs^>(this, &App::OnActivated);
}
There are some new parts here, so let's talk about them.
The Activated member of AppView is what is known as an event. An event is a special member of a class that provides it a pointer to a function. The function is called in certain circumstances, depending on the class. The Activated event is called as soon as the application has finished loading and the window is ready to be activated.
To provide the event with a function, we add it to the function, hence the "+=".
A TypedEventHandler is a class that processes events. We are actually going to create an instance one using ref new, provide it with the function pointer, then store the TypedEventHandler in AppView->Activated.
With me so far?
A TypedEventHandler is actually a generic class. It doesn't know what kind of function is to be called, so we have to tell it what the parameters will be. They should match the OnActivated() function we are using. And if you check, you'll see that they do.
The TypedEventHandler constructor takes two parameters. It needs to know who will be calling the function, and it needs to know the function to call.
The App class will be calling the function, so the first parameter will be "this".
We want the OnActivated() function to be called, so we provide the address of it in the second parameter: &App::OnActivated.
Let's see what we have in our App class now that we've added to it.
ref class App sealed : public IFrameworkView
{
public:
virtual void Initialize(CoreApplicationView^ AppView)
{
AppView->Activated += ref new TypedEventHandler
<CoreApplicationView^, IActivatedEventArgs^>(this, &App::OnActivated);
}
virtual void SetWindow(CoreWindow^ Window) {}
virtual void Load(String^ EntryPoint) {}
virtual void Run() {}
virtual void Uninitialize() {}
void OnActivated(CoreApplicationView^ CoreAppView, IActivatedEventArgs^ Args)
{
CoreWindow^ Window = CoreWindow::GetForCurrentThread();
Window->Activate();
}
};
And that's it! Run your program and enjoy!
Well, if you are still reading this, congratulations! You've delved into places few programmers ever go, and you're well on your way to game programming.
If this is your first time through this type of program, don't expect to remember it perfectly. I certainly won't demand it, and you can come back and dig through the code as many times as you like until you are completely familiar with it.
With that said, let's move on! We have three more short lessons to go before you are officially into DirectX! There is no time to lose!
Next Lesson: Window Events
GO! GO! GO!
© 2006-2026 DirectXTutorial.com. All Rights Reserved.
Expand